
HEALTH
What to Know Before Choosing Same-Day Dental Implants

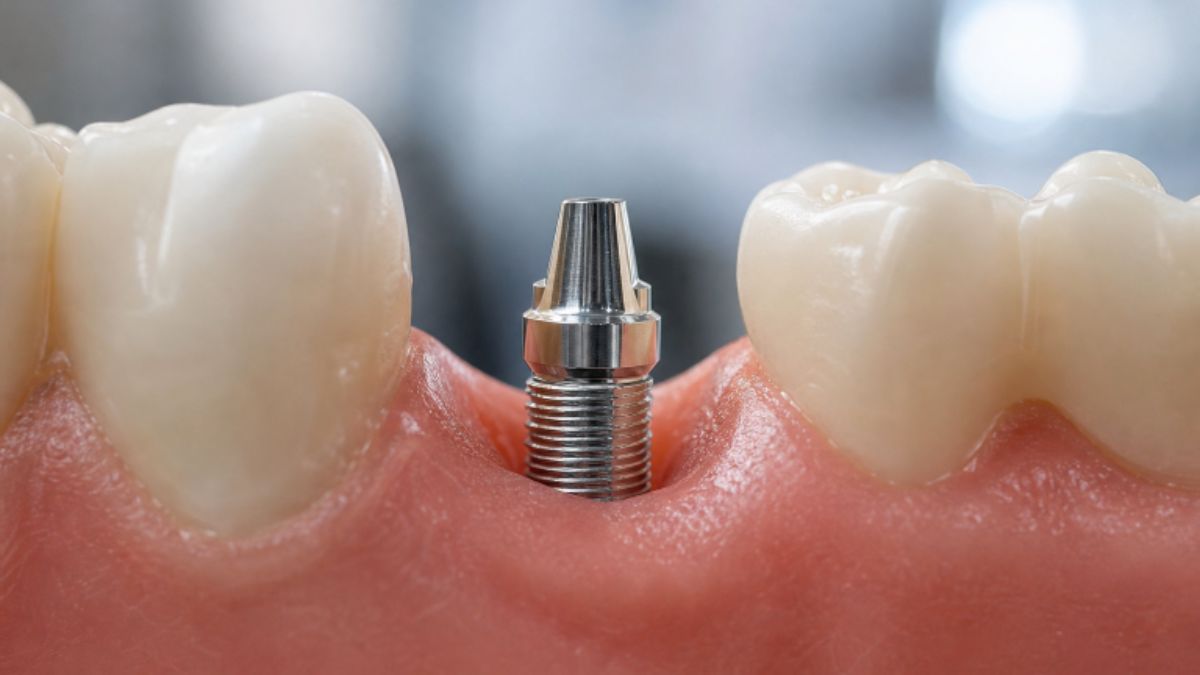
Replacing missing teeth can improve comfort, confidence, and everyday function, but it is important to understand what “same-day” treatment actually involves. Patients considering same day dental implants St. Louis, MO should expect a personalized process that begins with careful planning, not a one-size-fits-all appointment.
For some people, implants and temporary replacement teeth can be placed in a single visit. However, the implant still needs time to heal and bond with the jawbone before it can reliably support a final crown, bridge, or full-arch restoration.
What “Same-Day” Really Means
Same-day dental implants generally refer to an approach in which implants are placed, and a temporary crown, bridge, or denture may be attached on the day of surgery. It does not always mean that the final teeth are completed that day. As dental implant surgery often involves healing between stages, the exact timeline depends on bone quality, the number of teeth being replaced, and the type of restoration planned.
During healing, the jawbone gradually bonds with the implant through a process called osseointegration. This creates the stable foundation needed for long-term function. Follow-up visits allow the dental team to monitor healing, adjust the bite, and decide when it is appropriate to move from temporary teeth to the final restoration.
Who May Be a Candidate?
Candidacy involves far more than having a missing tooth. A dentist must determine whether the mouth and overall health can support a successful surgical and restorative plan.
- Healthy gums or gum disease that has been treated and stabilized.
- Enough jawbone to securely hold implants, or a viable grafting plan when needed.
- Medical conditions that are controlled and discussed with the dental team.
- A bite that can be managed without placing excessive force on healing implants.
- A commitment to avoiding tobacco and following aftercare instructions.
- Realistic expectations about temporary teeth, healing time, cost, and maintenance.
Bone loss, teeth grinding, uncontrolled diabetes, active gum disease, and tobacco use can affect timing and risk. These concerns do not automatically eliminate implant treatment, but they may mean that additional care or a different timeline is safer.
What Happens During the Consultation?
A thorough consultation is where speed and safety must work together. Someone replacing a recently lost tooth may need a very different plan from someone seeking stability for loose dentures or multiple failing teeth.
Planning Steps
- Review medical history, medications, allergies, and prior dental treatment.
- Examine teeth, gums, bite, jaw joints, and signs of bone loss.
- Use X-rays or 3D imaging to evaluate bone, nerves, sinuses, and implant positions.
- Discuss anesthesia or sedation options and transportation needs afterward.
- Review the temporary restoration, final materials, expected timeline, and total costs.
Patients should also ask how the restoration will be maintained over time. The parts of an implant-supported tooth and its long-term care needs can differ depending on whether the final teeth are fixed or removable.
What to Expect on Treatment Day
The appointment length varies widely. Extractions, the number of implants, bone condition, sedation, and the type of replacement teeth can all affect the schedule. In many cases, the day follows these general steps:
- Complete a final health review and confirm the treatment plan.
- Receive local anesthesia, sedation, or another approved comfort option.
- Remove damaged teeth when necessary.
- Place implants in the planned locations.
- Attach a temporary crown, bridge, or denture if the case allows.
- Review the written recovery instructions before leaving.
Temporary Teeth and the Healing Period
Temporary teeth can restore appearance and make daily life easier, but they are often designed with healing in mind. The dental team may adjust the bite to reduce direct pressure on the implants while they stabilize.
- Temporary teeth may feel larger or different at first.
- Soft foods may be necessary during early healing.
- The final restoration may use a different, more durable material.
- Follow-up visits check fit, hygiene, comfort, and bite pressure.
Recovery Tips and Warning Signs
Always follow the instructions provided by the treating clinician. In general, patients may be told to rest, choose soft foods, drink water, avoid smoking, use cold packs if recommended, and take prescribed medication exactly as directed. Mild swelling, soreness, bruising, and minor bleeding can occur after oral surgery.
Contact the dental office promptly if pain, swelling, bleeding, numbness, or drainage worsen rather than improve. Also report a loose implant, a broken temporary tooth, or an uneven bite. Severe bleeding, breathing difficulty, or signs of a serious allergic reaction require urgent medical attention.
Questions to Ask Before Treatment
- Will I receive temporary teeth or final teeth on treatment day?
- Will I need extractions, bone grafting, or gum treatment first?
- What imaging will be used to plan implant placement?
- How long is healing expected to take in my case?
- What foods, activities, and habits should I avoid?
- What happens if an implant does not integrate properly?
- What is included in the quoted cost, including temporaries and follow-up care?
- How will my final restoration be cleaned, repaired, or replaced?
Final Thoughts
Same-day dental implant treatment can shorten the time spent without visible teeth, but it does not remove the need for planning, healing, and ongoing maintenance. The best approach depends on oral health, bone support, lifestyle, budget, and willingness to follow aftercare instructions. A detailed consultation helps patients compare their options and choose a treatment timeline that supports lasting comfort and function.

Healthcare arrival areas set the tone for the entire visit. When patients face a long line, confusing forms, or uncertainty about where to go, even a well-run clinical appointment can begin with frustration. At the same time, front-desk employees often juggle calls, insurance questions, payments, record updates, directions, and requests for personal assistance.
Digital tools can reduce the routine burden without turning check-in into an impersonal transaction. For organizations evaluating patient and visitor self-service, Kiosk.com healthcare solutions outlines how Kiosk Information Systems supports healthcare check-in workflows involving registration, appointment confirmation, information updates, signatures, payments, and visitor identification. As a long-standing provider of self-service kiosk hardware, software integration, and support services, the company offers relevant options for hospitals and clinics seeking to improve patient flow while maintaining staff-assisted service.
Key Takeaways
- Shorter check-in times begin with simpler workflows, not technology alone.
- Digital forms, mobile arrival tools, and self-service stations can handle routine tasks.
- Front-desk employees remain essential for complex questions and personal support.
- Accessible design, clear instructions, and privacy protections build patient confidence.
- Organizations should measure wait times, completion rates, data quality, and feedback before expanding a new process.
Table of Contents
- Why Front Desks Feel Pressure
- Small Friction Points That Create Long Lines
- How Digital Arrival Tools Help
- Why Human Support Still Matters
- Where Kiosks Fit Into the Workflow
- Accessibility, Privacy, and Confidence
- A Practical Rollout Plan
- Metrics That Matter
- Common Questions
Why Front Desks Feel Pressure
A reception desk is rarely responsible for only greeting patients. Staff members may need to confirm appointments, verify demographics and insurance, collect balances, answer phones, explain paperwork, and direct people through a busy facility. When these tasks happen simultaneously during a morning appointment rush, a short delay at one step can affect everyone waiting behind it.
The goal should not be to eliminate the front desk. It should be to protect employee time for work that calls for judgment, reassurance, problem-solving, and a real conversation. Routine information gathering is a better candidate for a streamlined digital process than a sensitive billing concern or a patient who needs help understanding next steps.
The Small Friction Points That Create Long Lines
Long waits often come from many small obstacles rather than a single major failure. Paper forms can be incomplete or hard to read. Patients may not have an insurance card ready. A name, address, or phone number may need to be updated. Someone may arrive at the wrong desk or be unsure whether they have already checked in via text message.
Healthcare leaders can identify the most important improvements by asking:
- Which forms require the most staff follow-up?
- Where do patients most often stop or ask for assistance?
- Which information is entered more than once?
- What causes registration corrections later in the visit?
- Can patients easily tell what they need to do after arriving?
How Digital Arrival Tools Help
Pre-visit forms, reminder messages, electronic signatures, mobile check-in, and on-site self-service can move basic tasks away from the busiest moment at reception. Patients can review information before they arrive, while staff can focus on exceptions that require attention.
The strongest process connects each step rather than adding another disconnected task. A patient should not have to enter the same demographic information online, repeat it at a kiosk, and then provide it again to an employee. Scheduling, registration, payment, identity verification, and electronic health record workflows should be considered together during planning.
Why Human Support Still Matters
Self-service should be a choice, not a barrier. Some patients appreciate the privacy and speed of completing basic steps independently. Others may need assistance because of a disability, language preference, unfamiliarity with technology, anxiety, or the complexity of their visit.
A balanced model gives patients several paths forward. One person may complete most forms on a phone before arrival. Another may prefer a staff-assisted check-in. A third may begin at a kiosk but need help correcting an entry. In each case, visible and approachable employees remain central to a welcoming experience.
Where Kiosks Fit Into the Workflow
A kiosk is most effective when it solves a specific operational problem. Depending on the facility and system connections, it may support appointment confirmation, registration updates, consent forms, identity checks, payment collection, wayfinding, or visitor sign-in. It should have a clear role in the arrival journey and a clear handoff to staff when needed.
Placement matters as much as functionality. A device that is hidden from the entrance, positioned in a crowded walkway, or introduced without clear signage can create confusion rather than reduce it. Staff should be ready to explain when patients should use self-service and when they should go directly to a person.
Accessibility, Privacy, and Patient Confidence
Accessible design is not an optional finishing touch. Screens should be readable, instructions should use plain language, and controls should be reachable and usable by a broad range of patients. The ADA Standards for Accessible Design provide an important reference for facility accessibility when organizations install or alter physical elements.
Privacy also shapes adoption. The HIPAA Privacy Rule establishes national standards for protecting individually identifiable health information. In practice, healthcare organizations should consider screen visibility, queue spacing, payment privacy, session timeouts, and clear instructions about what information is being requested.
A Practical Rollout Plan
- Map the current journey. Follow each step from arrival through handoff to care.
- Choose one bottleneck. Start with the task that creates the most avoidable delay.
- Run a limited pilot. Test one department, location, or appointment type first.
- Offer alternatives. Keep staff-assisted options available throughout the pilot.
- Train employees. Give teams simple guidance for helping patients and resolving common errors.
- Adjust before expansion. Use real observations and feedback to refine the experience.
Metrics That Matter
High self-service usage alone does not prove a process is working. Track average arrival-to-check-in time, wait time for staff help, completion and abandonment rates, registration corrections, insurance-data accuracy, payment completion, patient feedback, and employee feedback. Compare results by appointment type and time of day to identify where additional support is needed.
Common Questions About Digital Check-In
Will digital check-in replace front-desk employees?
It does not have to. The most practical objective is to reduce repetitive administrative work so staff can spend more time helping patients with needs that cannot be solved through a screen.
Do all patients need to use a kiosk?
No. Patients should have reasonable alternatives, including direct staff assistance. Choice helps make the process more equitable and more comfortable.
What is the biggest implementation mistake?
Adding technology without redesigning the workflow. Clear instructions, integration, accessibility, device placement, and staff readiness determine whether a digital arrival tool reduces friction or adds another step.
A Faster Welcome Can Still Feel Personal
Healthcare organizations do not need to choose between efficiency and compassion. When routine check-in tasks are designed to be simple, accessible, and connected, employees have more capacity to provide the human support patients remember. The best arrival experience is not the one with the most technology. It is the one that helps each patient move forward with less confusion, less waiting, and the right level of care.

A sudden collision can disrupt your entire day in an instant. The moments after a crash often bring stress, confusion, and a rush of adrenaline. Knowing which steps to take first can help protect your health and your legal rights.
Being prepared can make a big difference when dealing with the chaos after a crash. A clear plan helps you focus on safety and gathering evidence instead of panic. This guide explains the best ways to protect yourself and your interests after an accident.
Prioritize Safety at the Scene
Moving your vehicle out of active traffic can help prevent another crash and keep everyone safe. Police officers handle immediate dangers, while skilled car accident lawyers in Pittsburgh can help with the legal issues that follow. Taking this step quickly lowers the risk of further harm to you and other drivers.
Turn on your hazard lights to warn other drivers about the crash. Call emergency services right away to report the motor vehicle accident and ask for medical help. Paramedics can check for injuries and provide care after the impact.
Gather Accurate Evidence and Information
Collecting clear details at the crash site can support your future claims. Exchange contact details, insurance information, and license plate numbers with the other driver. Keep your conversation focused on these basic facts.
Use your smartphone to take photos of the scene. These images can provide useful proof of what happened. Take pictures before the vehicles are moved or towed away from the road:
- Close-up photos of damage to all vehicles involved
- Wide shots of the intersection, road signs, and skid marks
- Photos of any visible injuries soon after the crash
- Names and phone numbers of witnesses who stopped to help
- Notes about the weather and lighting at the time of the crash
Report the Crash to Authorities and Insurers
A police report provides an official record of the crash. Officers will speak with both drivers and check the evidence at the scene. This report can be important when you file a car accident claim later.
Be honest with the officer and avoid guessing about details you did not see. Explain what happened and describe any unusual driving you noticed before the crash. Let the police review the evidence and decide who may be at fault.
Share the basic facts with your insurer without making a final statement about the crash. Stick to who was involved, what happened, when it happened, and where it took place. Taking this step carefully can help you work toward a fair auto insurance settlement later.
Seek Thorough Medical Evaluation
Visit an urgent care clinic or emergency room as soon as possible to create a medical record. Adrenaline can hide the pain of soft-tissue injuries for hours or even days after a crash. A medical exam can find hidden injuries before they become worse or lead to lasting problems.
Follow your doctor’s treatment plan closely. Attend every physical therapy session and take your prescribed medication as directed. Missing appointments may make it seem like your injuries are minor or that you do not need further care.
Stay Organized for a Smoother Claims Process
Staying organized and acting early can reduce much of the stress during the claims process. A clear plan can help you recover, protect your rights, and work toward a fair outcome. Stay updated with our latest blog posts for similar topics.
If you’d like to learn more, check out more articles on our blog.

Walking into a dental office for the 1st time can feel scary for a young child. Bright lights, strange tools, and unfamiliar faces often trigger worry before a kid even sits in the chair. Parents can take a few simple steps at home to turn that nervousness into calm curiosity.
Continue reading to discover everything you need to know!
Choose A Kid-Friendly Dental Practice Early
Finding the right office shapes how your child views dental care from day one. You can look at local clinic websites to discover feedback from satisfied patients and see how the team treats nervous kids. Reading real stories from other parents helps you pick a welcoming practice with gentle staff.
Ask the front desk if your family can stop by for a quick tour 1 week before the checkup. Letting your child see the waiting room toys and meet the receptionist builds comfort fast. A familiar space feels much safer than walking into a brand-new building on appointment day.
Use Positive Words When Talking About The Dentist
Kids pick up on adult stress, so keep your tone upbeat whenever the upcoming visit comes up. A pediatric dental care guide notes that words like “hurt” or “shot” can trigger fear, so parents should stick to positive, simple language instead. Tell your child that the dentist will count their teeth and help keep their smile strong.
Skip sharing your own past dental struggles or complicated stories about cavities. Keep answers short and honest when your child asks what happens during a checkup. Simple facts give kids clear answers without creating dental anxiety.
Practice Pretend Checkups At Home
Role-playing turns an unknown visit into a fun game that your child controls. Set up a pretend dental chair in the living room 3 or 4 days before the real appointment.
- Grab a favorite stuffed animal
- Use a clean toothbrush
- Shine a small flashlight
- Switch turns so your child practices
Picture books and short cartoons about visiting the dentist can support these playful practice sessions. Seeing favorite characters enjoy a checkup shows your child that dental visits are a normal part of growing up.
Give Your Child A Sense Of Control
Fear grows when kids feel stuck in a chair without a voice. A health guide from Cleveland Clinic suggests setting up a clear stop signal, such as raising a hand, so a child can ask for a break at any moment. Knowing they can pause the exam helps kids relax and trust the dental team.
Let your child make small choices on appointment day, like picking their outfit or comfort toy. Having 1 or 2 simple decisions in their hands shifts their focus away from worry.
Plan The Appointment Timing Smartly
Booking a visit during a child’s best time of day prevents meltdowns before you arrive. Morning slots work well for young kids who get cranky after skipping a nap.
Feed your child a light snack about 1 hour beforehand so hunger does not add to their stress. Arriving 10 minutes early gives you plenty of time to check in without rushing.
Leave Dental Anxiety Behind Before the First Checkup
Calm preparation at home sets the stage for a smooth 1st checkup and healthy habits that last for years. With patience, playful practice, and a supportive dental team, your child can walk into visit 1 feeling confident and ready to smile.
Want more advice on making dental visits easier for children? Explore more articles on our blog for helpful tips on pediatric dental care, easing dental anxiety, building healthy habits, and keeping little smiles bright.
-

 NEWS1 year ago
Historical Churches in Manila
-

 TOPIC4 months ago
Unveiling AvTub: Your Ultimate Guide to the Best AV Content
-

 TOPIC1 year ago
Simbang Gabi and Kakanin
-

 TOPIC1 year ago
Symbols of Hope: The 15th Belenismo sa Tarlac
-

 BUSINESS6 months ago
Exploring the Different Types of Понуде in Business Transactions
-

 NEWS5 months ago
What Caused Delta Flight DL275 to Diverted LAX? A Detailed Breakdown
-

 TOPIC1 year ago
RIZAL at 160: a Filipino Feat in Britain
-

 TOPIC3 months ago
Understanding Fascisterne: Origins and Ideological Roots