
TECHNOLOGY
Hard Drive Recovery: How to Recover Data from SSD After Deletion

SSD Data Recovery Guide: DIY Software Steps or Call a Pro?
Losing files on an SSD feels different to losing them on an old mechanical drive, and the panic is often justified. Modern solid-state drives run a background process called TRIM that cleans out deleted data much faster than traditional hard drives ever did. That one difference is why timing matters so much when you’re doing hard drive recovery on solid-state storage.
This guide outlines the exact steps for SSD data recovery and explains when software is most effective. It also tells you precisely when a professional lab is your only remaining choice. Whether you have accidentally deleted a file or folder, or your drive suddenly stopped showing files, knowing what to do is half the battle. Learning how to deal with recovery data harddisk situations properly can save your photos, documents, and your peace of mind.
Critical First Step: Stop Using Your SSD Immediately
Stop writing new data to the affected SSD immediately, first of all, even for a moment. Every time you save a file, open a program or update a background process, you run the risk of overwriting the sectors that contain your lost data. That urgency stems from TRIM, a command your operating system sends to the SSD when you delete something. TRIM tells the drive which blocks are free, and the drive often proactively erases them instead of waiting. If TRIM has already run on those sectors, recovery is much more difficult, sometimes impossible.
So the first real move in any serious attempt to recover data from hard drive storage built on flash memory is simple. As soon as you realize that files are missing, you should avoid these things:
- Don’t install anything new. Every installer writes new data which might be written to the sectors you need.
- Don’t run disk cleanup or defrag tools. These actively invoke TRIM on the remaining free space.
- Don’t keep browsing or downloading. Cached files and temporary data quietly consume free space in the background.
- Do unplug the drive if possible. Cutting the power will stop any pending TRIM commands from completing their task.
- Do think before you click. Now take a few careful minutes to protect your chances for full recovery later.
When to Use Software: DIY Recovery with 4DDiG
If you catch the deletion quickly and TRIM has not yet run to completion, thanks to software, you have a good chance of recovery. Tools like 4DDiG scan the raw sectors of your SSD, looking for file fragments that are no longer listed by the operating system. This method is best for accidental deletion, fast formatting, or files lost after a partition error, but not for physical damage.
There are a few clear reasons why software-based hard drive recovery makes good sense as a first step for most people:
- It’s non-invasive. No part of the process opens or physically alters your drive.
- It’s affordable. You don’t have to pay lab fees at all if there is no hardware damage.
- It’s fast. Results are often available within an hour, rather than the days required for lab evaluation.
- It’s accessible—no need to ship your drive anywhere or wait for a shop’s schedule.
Most casual users should try a reputable recovery program first before paying for a professional lab. I would imagine many deletion cases are resolved successfully at this early stage with no physical intervention or costly diagnostic fees. Software is the logical first step for almost any SSD deletion case you’re likely to face, thanks to speed and accessibility.
Step-by-Step Software Recovery Process
Good news: you don’t need a lot of technical skill to recover files yourself, just a lot of attention to detail at each step of the process. Here’s the practical workflow most recovery programs follow, including 4DDiG Windows Data Recovery, a tool built specifically for these situations.
Step 1: Prepare for Recovery.
Proper preparation before scanning can save time and protect the files you want to recover. First, run through this quick checklist:
- Install to a different drive. If you install the software on the affected SSD, you risk overwriting the files you want to recover.
- Close background apps. Fewer running programs, less new writes hitting the affected drive.
- Prepare a save location. Have a second drive or USB stick ready for the files you will recover.
- Note the deletion timing. Knowing roughly when files went missing tells you how deep your scan should go.
If you deleted files a few minutes ago, a quick scan may be enough to recover all you need.
Step 2: Select Your SSD
Launch the recovery software, and you will see a list of all connected drives and partitions on your system. Find the specific SSD, or the specific partition on it, where your lost files used to be. Choosing the right drive is extremely important, as scanning the wrong location is a waste of time and effort. Most programs display the drive size and format type so you can verify you are targeting the right drive before the scan begins. 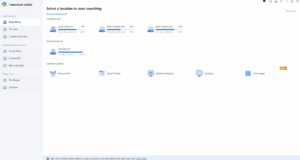
Step 3: Scan for Lost Photos
You can start the scan and let the software run a quick pass, then a deeper, more thorough search. The quick scan usually locates recently deleted files in a few minutes, while the deep scan works on raw data to restore older files. That is where the real SSD data recovery work happens, as the algorithm reconstructs file signatures from scattered sectors. The length of the scan depends on the drive’s size and the amount of damage, so don’t interrupt the process prematurely; let it run its course. 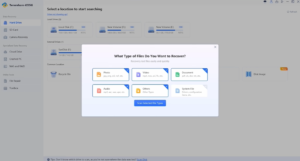
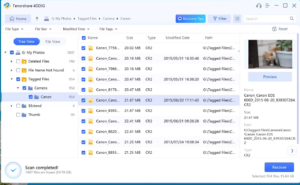
Step 4: Preview and Recover
When the scan is finished, you can browse the organized results, often divided by type such as photos, documents or videos.
With trustworthy software, you can view pictures and documents before recovery, ensuring the files are not damaged. Choose all the files you want to restore and save the recovered files to a different drive, not the original SSD. This last step completes the DIY process and, for many users, fully solves the recovery data hard disk problem at no additional cost.
When to Stop and Call a Professional
There will be many deletions handled by software, but there are warning signs that mean you need to stop and bring in an expert.
Physical Failure Signs
Watch for these warning signs — they’re signs of hardware damage, and software can’t fix them:
- Unusual sounds. Clicking, grinding, or buzzing noises generally indicate a physical part is failing.
- The drive doesn’t appear at all.A missing drive in your system settings usually indicates a more serious hardware fault.
- A damaged controller chip, firmware, or memory cells. Any consumer software can fix any of these.
- Repeated scan attempts. Additional scans on a physically failing drive can accelerate its complete failure.
These symptoms require immediate attention from a lab with cleanroom facilities and specialized hardware tools.
Severe Logical Failure Signs:
Sometimes a drive seems to be working but is more corrupt than consumer software can fix. Watch out for:
- Unallocated or RAW status. The drive is detected, but there is no readable file system.
- Zero-byte capacity. The SSD suddenly reports no free space, even though the drive is detected and working fine.
- Heavy overwriting or a failed firmware update. Both can do more damage to the file system than software alone can fix.
- Extensive TRIM activity. Once TRIM has cleared out large portions of the drive, the chances of recovery go way down.
In these advanced cases, only specialized hard drive recovery equipment and manual sector-level work can recover your data. In this situation, trying to force a drive scan usually does not help and sometimes makes things measurably worse. Professionals use controlled, low-level techniques designed specifically to avoid further stress on already compromised memory cells.
Software Recovery Has Failed
If you have already tried a trusted recovery tool and it didn’t find anything usable or the files came back corrupted, stop trying. Multiple recovery attempts on a struggling drive, even with additional passes, increase the risk of further damage. A professional lab can get to the hardware level of the drive, something consumer software can’t do. This hard drive data recovery resource clearly lays out the decision points for when to escalate for a closer look.
What Professional Recovery Involves
Professional labs are housed in cleanroom environments designed to prevent dust and static from further damaging sensitive components. It is slower and more expensive than software recovery, but it reaches data that no consumer program could ever access. What that process generally looks like is:
- Cleanroom hardware work. Technicians can also transfer memory chips to donor boards, or fix broken controllers.
- Direct chip reading. In extreme cases, they even read raw NAND flash directly with special tools.
- An upfront diagnostic. Preliminary assessment and quotation before any physical work.
- Honest odds, not guarantees. Good labs will tell you what your odds are, not promise you success every time.
- A realistic timeline. Turnaround time usually runs a few days to a couple of weeks, depending on the damage.
- No recovery, no fee policy. Many existing labs will offer this as standard before you sign on the dotted line.
It protects you financially in the unlikely event that even hardware-level recovery can’t successfully restore your files.
How to Choose the Right Path
Match your situation with the right recovery path using this quick decision guide:
- If your SSD is still working fine and the data loss was due to deletion, formatting, or another logical error, start with software.
- Call a professional service if you hear strange noises, the drive is not recognized, or the data is irreplaceable.
- Consider your budget, as the software will cost a fraction of what professional SSD data recovery services will charge you for physical repairs.
- When in doubt, run a free scan first; it shows whether your files are recoverable before you spend money.
This balanced approach keeps you from overpaying for a pro when you can do the job with software alone. It shows you how to recover data from hard drive issue without incurring unnecessary costs. It also prevents your drive from being scanned repeatedly if you know the right path. 
Frequently Asked Questions
Q1: Can I really recover data from an SSD after deletion?
Yes, but success will depend on several factors. The data is very recoverable with tools like 4DDiG since the TRIM command has not been run yet. The most important thing is to act immediately.
Q2: Is 4DDiG safe for SSD recovery?
Absolutely. 4DDiG works in read-only mode. It does not write to or modify your drive in any way when scanning or recovering, so it is completely safe to use on SSDs.
Q3: Why didn’t the free recovery tool find my photos?
Many free tools lack scanning algorithms or support for the latest file systems. 4DDiG supports 2000+ file types and is powered by patented technology, significantly increasing your chances of success.
Q4: How much does professional SSD recovery cost?
The costs vary widely, usually from $300 to over $2000. What is the ultimate price? The extent of physical damage and the complexity of the recovery determine the cost. Always get a free evaluation and quote before agreeing to any repair work.
Q5: What is the TRIM command and why does it matter?
TRIM is a command that allows the operating system to tell the SSD about data blocks that are no longer needed. Then the SSD can erase those blocks in the background, making recovery from that part impossible. That is precisely why you must stop using the drive right after any deletion.
Q6: Does 4DDiG offer a free version?
Yes. The free version can scan and preview recoverable files up to 2GB. This way you can check if your photos can be recovered before buying the full software.
Final Thoughts
Losing data from your SSD is stressful, but if you act quickly and choose the right path, it’s rarely hopeless. First, halt all activity on the drive. Next, test it with a trusted program like 4DDiG for a quick try. If there is physical damage or severe corruption, escalate to a professional recovery lab instead. Knowing these steps puts you back in control of your situation, whether it’s a need for hard drive recovery software or hands-on expert repair. Also, be sure to maintain a routine backup habit in the future, as software can’t guarantee results every time. Redundancy is cheap. Professional data recovery is seldom needed.

Technology is no longer limited to brand-new vehicles. Many used cars now offer features that can make commuting, errands, family travel, and longer road trips more convenient. Depending on the vehicle’s age, trim, and equipment package, shoppers may find smartphone integration, backup cameras, driver-assistance systems, parking sensors, Bluetooth, navigation, and other useful technologies. When comparing options at a used car dealership Roanoake, understanding which features provide genuine everyday value can make the shopping process more practical. The goal is not simply to find the newest technology, but to find a used vehicle with features that suit the way it will actually be driven.
Smartphone Integration Keeps Familiar Apps Accessible
Apple CarPlay and Android Auto are among the most useful technologies to look for in a used vehicle. Compatible systems allow drivers to connect a smartphone with the vehicle’s infotainment display and access selected navigation, communication, music, and voice-assistant functions.
For drivers who already use smartphone-based navigation and entertainment, this can make the transition into a used vehicle much easier. Instead of learning an entirely different digital ecosystem, they can continue using familiar applications through the vehicle.
Availability varies considerably by model year and trim, so shoppers should verify whether a particular vehicle offers wired or wireless connectivity. Consumer Reports also notes that wireless smartphone integration can be especially convenient when paired with a wireless charging pad.
Bluetooth Makes Calls and Audio More Convenient
Bluetooth is another technology worth checking when shopping for a used car. Compatible systems can allow drivers to make hands-free calls and stream audio from a smartphone without connecting a physical cable.
This can be valuable for daily commuting because a driver can keep a phone stored safely while accessing calls or music through the vehicle’s controls. Bluetooth can also be useful for passengers who want to connect their own devices during longer journeys.
Before purchasing a used vehicle, it is worth testing the Bluetooth connection. Pair a compatible phone, make a call, and play audio to ensure that the system works as expected.
Backup Cameras Improve Rearward Visibility
A backup camera is one of the most practical safety technologies available in modern vehicles. It provides a view of the area directly behind the car while reversing.
NHTSA explains that backup cameras help drivers see behind the vehicle and can help prevent backover crashes. The agency also emphasizes that cameras should not replace mirrors or physically checking the surroundings.
For used-car shoppers, this feature can be especially helpful in crowded parking lots, driveways, and narrow spaces. When evaluating a vehicle, check whether the camera image is clear and whether the display responds quickly when reverse is selected.
Blind Spot Warning Can Add Awareness During Lane Changes
Blind Spot Warning is another feature that can add value to a used vehicle. The system monitors areas alongside the vehicle and can alert the driver when another vehicle is detected in a blind spot.
NHTSA describes Blind Spot Warning as a system that alerts drivers when a vehicle is present in an adjacent lane and may not be visible through normal observation.
This can be useful during highway driving and on busy multilane roads. However, the technology should supplement—not replace—mirror checks and looking over the shoulder before changing lanes.
When inspecting a used vehicle with this feature, confirm that the warning indicators operate properly and check the owner’s manual for information about the system’s operation and limitations.
Forward Collision Warning Provides Another Layer of Awareness
Forward Collision Warning can be useful for drivers who want additional assistance when monitoring traffic ahead. NHTSA explains that the technology detects a potential collision with a vehicle ahead and provides a warning to the driver.
This can have everyday value in traffic where vehicles may slow or stop unexpectedly. It is important to understand that Forward Collision Warning generally provides an alert rather than automatically stopping the vehicle.
Some used vehicles may also have Automatic Emergency Braking, which can apply the brakes when a forward collision is imminent. NHTSA identifies Automatic Emergency Braking as a technology that can help avoid or reduce the severity of certain forward crashes.
Lane Assistance Can Help With Highway Driving
Lane Departure Warning and Lane Keeping Assistance are technologies that may be particularly useful for drivers who frequently travel on highways.
Lane Departure Warning monitors lane position and alerts the driver when the vehicle approaches or crosses lane markings. Lane Keeping Assistance can provide steering input to help prevent unintended lane departure.
These systems can provide additional awareness during longer drives, but drivers remain responsible for steering and monitoring the road. Lane markings, weather, construction zones, and other conditions can affect system performance.
When shopping for a used vehicle, test the feature only in appropriate conditions and review the vehicle’s instructions to understand how it operates.
Adaptive Cruise Control Can Make Longer Drives Easier
Traditional cruise control maintains a selected speed, while Adaptive Cruise Control can adjust the vehicle’s speed to maintain a preset following distance from traffic ahead.
NHTSA describes Adaptive Cruise Control as a system that automatically adjusts speed to maintain a selected distance from the vehicle in front.
For drivers who frequently travel on highways, this can add convenience during periods of steady traffic. It can reduce the need for repeated accelerator adjustments, although the driver must remain attentive and prepared to intervene.
Because adaptive cruise control was introduced at different times across manufacturers and models, shoppers should check the exact year and trim rather than assuming every used vehicle has it.
Parking Sensors Can Make Tight Spaces Easier
Parking sensors can be another useful technology for everyday driving. These sensors can alert drivers when an object is close to the vehicle during parking maneuvers.
Combined with a backup camera, parking sensors can provide two different types of information: a visual view behind the vehicle and alerts about nearby objects. This combination can be helpful in garages, shopping-center parking lots, and narrow driveways.
During a test drive, shoppers can check whether the sensors produce consistent warnings and whether the dashboard or infotainment display provides clear information.
Automatic High Beams Can Help at Night
Automatic high-beam technology can make nighttime driving more convenient. The system can switch between high and low beams based on lighting conditions and approaching traffic.
NHTSA explains that automatic high beams use sensors or cameras to determine when switching between high and low beams may be appropriate.
For used-car shoppers who frequently drive outside brightly lit areas at night, this can be a helpful feature. As with other driver-assistance technologies, it should be treated as an aid rather than something the driver can rely on without monitoring the road.
Touchscreen Infotainment Can Improve Daily Convenience
A touchscreen infotainment system can bring several functions together in one location. Depending on the vehicle, it may provide access to audio, phone settings, navigation, vehicle information, and smartphone integration.
However, shoppers should pay attention to usability rather than screen size alone. A system that responds quickly and has straightforward menus may be more useful than a larger display with complicated controls.
It is also worth checking whether the infotainment system still supports the smartphone technologies the buyer uses. Older systems may have Bluetooth but lack Apple CarPlay or Android Auto, making compatibility an important consideration.
USB Ports and Wireless Charging Add Practical Value
Charging options may seem like a minor feature, but they can be useful every day. USB ports allow drivers and passengers to charge compatible devices during commutes and road trips.
Some used vehicles may also offer wireless smartphone charging. This can reduce cable clutter and make it easier to keep a compatible phone charged.
Shoppers should inspect the ports individually because older vehicles may have USB-A connections rather than newer USB-C ports. Testing each connection can also reveal whether a port is functioning correctly.
Connected Services Can Extend Vehicle Functionality
Some used vehicles include connected services that can provide remote functions, emergency assistance, vehicle information, navigation support, or other services. However, these features can depend on subscriptions, cellular networks, vehicle age, and manufacturer support.
This makes it important to research the specific vehicle rather than assuming every connected feature remains active after ownership changes. A feature may also require a paid plan.
Understanding these limitations can prevent buyers from placing too much value on a service that may no longer be available.
Check Technology Before Buying a Used Vehicle
Technology should be evaluated just like mechanical and interior components. During a test drive, shoppers can check the infotainment display, pair a phone, test Bluetooth audio, inspect the backup camera, and verify that available safety alerts operate correctly.
NHTSA recommends that shoppers understand the capabilities and limitations of driver-assistance technologies and review the vehicle owner’s manual for specific information.
A vehicle history report and professional inspection can also complement the technology evaluation. If a warning light is illuminated or an electronic feature is not working correctly, the issue should be investigated before completing the purchase.
Conclusion
Used-car technology can provide meaningful everyday value when it supports the way a vehicle is actually used. Smartphone integration, Bluetooth, backup cameras, blind spot warnings, collision alerts, lane assistance, adaptive cruise control, parking sensors, automatic high beams, and charging options can all improve convenience or awareness.
The best technology package depends on individual priorities. Instead of choosing a used vehicle simply because it has the longest list of features, shoppers can focus on technologies they expect to use regularly. Testing those features during an inspection and confirming their availability for the specific model year can help ensure that modern technology remains a useful part of the ownership experience.

Startups are natural early adopters of AI software. The right product can help a small team automate routine work, test ideas faster, and deliver capabilities that once required a much larger organization. The challenge is that the market is crowded with tools making similar promises.
A startup can easily spend more time testing software than it saves by using it. A disciplined discovery and evaluation process helps founders capture the benefits of AI without building an expensive, fragmented stack.
Begin with a workflow, not a trend
The strongest reason to adopt a tool is a clearly defined problem. Teams should identify the workflow that is slow, repetitive, inconsistent, or limiting growth.
Starting with the problem prevents “AI” from becoming the requirement. It also creates a measurable outcome, such as faster research, shorter production cycles, improved response time, or fewer manual data updates.
Set constraints before searching
A startup should decide what it can realistically support. Budget, security, integration requirements, and implementation effort are as important as features.
Founders should also consider who will own the tool. Software without a clear user or operating process often becomes another unused subscription.
Use curated discovery to narrow the market
Broad searches can return hundreds of products. Curated resources such as Slate index can provide a more structured view of AI tools and help startups explore solutions by use case.
For sales, marketing, and revenue workflows, GTM Exchange can focus discovery on technologies relevant to go-to-market execution.
These platforms should be starting points rather than automatic decision makers. Their value is helping a team identify plausible candidates quickly.
Run small, measurable trials
Startups should test the workflow, not just the interface. A short trial should use realistic data and involve the people who will use the product after purchase.
The team should define success in advance. A tool may save time but introduce quality problems, require extensive oversight, or create extra work elsewhere in the process. Those effects should be included in the evaluation.
Watch for overlap and switching costs
AI tools often expand their feature sets. A new product may duplicate software already in the stack, while an existing vendor may offer a capability the team has not enabled.
Before purchasing, startups should ask what the tool replaces, which data it stores, and how difficult it would be to leave. Export options, integrations, and contract flexibility matter even during early experimentation.
Build a stack that can evolve
The goal is not to predict the single best long-term tool. The market is moving too quickly for that. The goal is to make reversible, evidence-based decisions.
A healthy startup stack has clear owners, measurable value, limited duplication, and regular reviews. By combining curated discovery with disciplined trials, startups can benefit from AI innovation without turning software selection into a constant distraction.

Commercial construction is a complex ecosystem where engineering precision, regulatory oversight, and project management converge. For commercial builders, turning ambitious architectural blueprints into structural reality requires far more than just managing labor and materials. It demands a holistic master strategy that accounts for environmental factors, municipal mandates, safety standards, and operational risk.
To navigate this dynamic landscape, commercial general contractors and site managers must prioritize key operational pillars that safeguard project timelines, maintain profitability, and ensure long-term structural integrity.
1. Comprehensive Site Assessment and Geotechnical Evaluation
Before heavy machinery ever breaks ground, a thorough understanding of site-specific conditions is essential. Commercial developments often present unique topographic, soil, and hydrological challenges. Conducting comprehensive geotechnical surveys early allows project leaders to anticipate soil instability, high water tables, and natural drainage patterns.
Addressing site conditions proactively prevents catastrophic foundation delays and expensive structural re-engineering mid-project. Effective land preparation sets the baseline for the entire build lifecycle, ensuring that structural loads, excavation depth, and underground infrastructure are perfectly aligned with the natural environment.
2. Rigorous Environmental Compliance and Stormwater Management
Environmental regulations have become increasingly strict, with local, state, and federal agencies imposing heavy penalties for non-compliance. Stormwater management is often one of the most heavily scrutinized aspects of commercial earthwork. Uncontrolled sediment runoff, improper chemical storage, or inadequate erosion controls can lead to costly stop-work orders and severe environmental degradation.
A compliant project relies on well-structured Best Management Practices (BMPs) and trained personnel who understand regulatory expectations. For instance, obtaining a SWPPP certification in Idaho or adhering to similar regional stormwater standards equips site supervisors with the specialized skills needed to inspect, maintain, and document erosion controls effectively. Ensuring your team understands environmental mandates keeps your job site active, avoids regulatory fines, and protects surrounding watersheds.
3. Subcontractor Coordination and Quality Assurance Protocols
A commercial build is only as reliable as the trade partners executing the specialized work. Managing multiple subcontractors—from steel erectors and MEP specialists to grading teams—requires crystal-clear communication and structured quality assurance protocols.
Establishing standardized quality control checklists at every phase prevents minor workmanship issues from cascading into major systemic defects. Regular trade coordination meetings, synchronized scheduling, and clear accountability ensure that safety standards are upheld and work handoffs occur smoothly across all trades.
4. Dynamic Risk Management and Supply Chain Resilience
Unforeseen material delays, labor shortages, and unexpected weather events can disrupt even the most meticulous schedule. Successful commercial builders cultivate supply chain resilience by establishing relationships with multiple suppliers, pre-ordering long-lead materials, and incorporating buffer periods into critical path schedules.
Simultaneously, dynamic risk management involves continuous job site safety audits and proactive risk assessments. Building a culture where safety and compliance are prioritized minimizes accidents, lowers insurance liabilities, and keeps projects moving forward without costly disruptions.
5. Leveraging Construction Technology and Digital Documentation
Modern commercial construction relies heavily on technology to maintain accuracy and efficiency. Building Information Modeling (BIM), real-time site monitoring, and digital inspection logs allow project managers to spot design conflicts and compliance gaps before they manifest in the field.
Maintaining centralized, cloud-based project documentation ensures that inspection reports, permit updates, and design revisions are immediately accessible to field crews and stakeholders alike. Streamlined digital communication minimizes rework and provides an unassailable audit trail throughout the construction lifecycle.
Conclusion
Mastering commercial construction requires balancing structural precision with strategic foresight. By prioritizing early site evaluation, maintaining uncompromising environmental compliance, managing subcontractor workflows, and leveraging digital tools, commercial builders can consistently deliver high-quality projects on time and within budget. Building modern commercial spaces isn’t just about erecting structures—it’s about engineering sustainable, compliant, and enduring e
-

 NEWS1 year ago
Historical Churches in Manila
-

 TOPIC2 months ago
Unveiling AvTub: Your Ultimate Guide to the Best AV Content
-

 TOPIC1 year ago
Symbols of Hope: The 15th Belenismo sa Tarlac
-

 TOPIC1 year ago
RIZAL at 160: a Filipino Feat in Britain
-

 TOPIC1 year ago
“The Journey Beyond Fashion” – Ditta Sandico
-

 TOPIC1 month ago
Understanding Fascisterne: Origins and Ideological Roots
-

 TOPIC1 year ago
Simbang Gabi and Kakanin
-

 NEWS3 months ago
What Caused Delta Flight DL275 to Diverted LAX? A Detailed Breakdown