
TOPIC
Floodplain Rules and No Zoning: What Houston Contractors Must Account for in Their Estimates

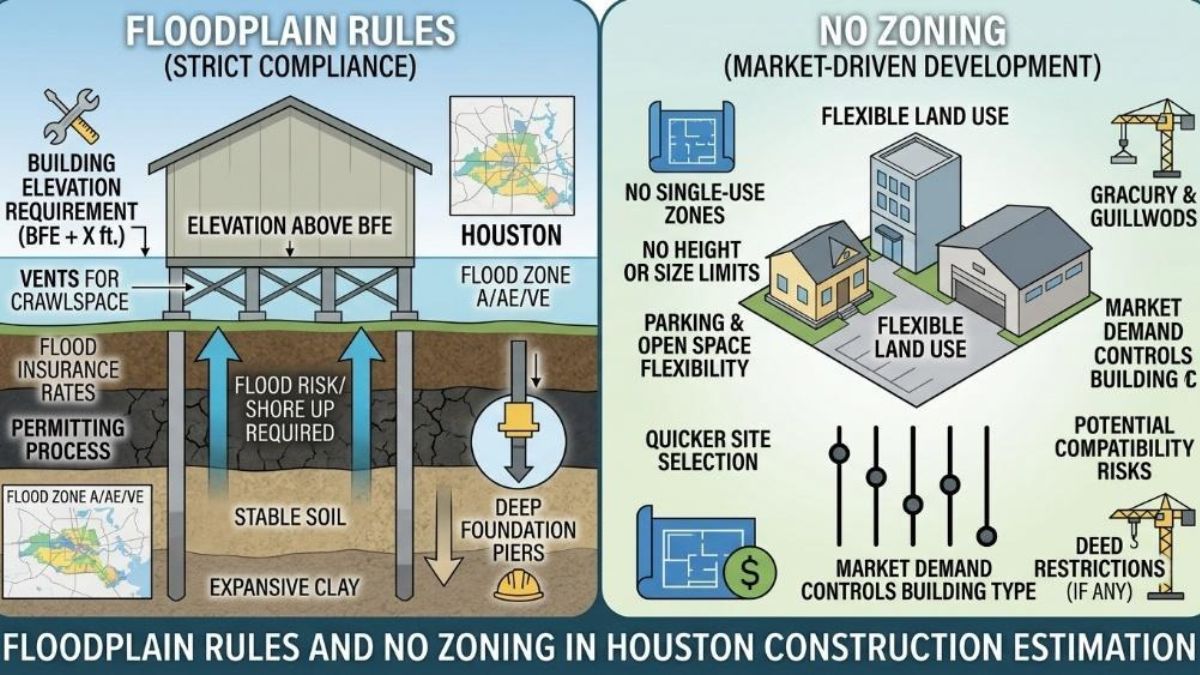
People outside Texas love to say Houston is the city where you can build anything anywhere. Contractors who actually work here know better. Houston has no traditional zoning, but it has plenty of rules, and the ones that hit your estimate hardest usually have to do with water.
A lot that looks like an easy slab-on-grade build can turn out to sit in the 500-year floodplain. Then the finished floor has to go up, the fill you planned may not be allowed, and the site suddenly needs detention. On top of that, the city’s development rules and neighborhood deed restrictions can change what you’re allowed to build before a single drawing is finished.
This guide walks through the floodplain and land-use rules that matter most for Houston bids, and how to price them so they don’t surprise you after you’ve signed the contract.
Houston’s Floodplain Rules After Harvey
Hurricane Harvey changed how Houston regulates building in flood-prone areas. In 2018, City Council amended Chapter 19, the city’s floodplain ordinance, and the new rules took effect on September 1, 2018.
The biggest change is how high buildings must sit. Before 2018, new structures in the flood hazard area had to be 12 inches above the 100-year flood elevation. Now the standard is 24 inches above the 500-year flood elevation. The rule covers both the 100-year and 500-year floodplains, so many properties that used to have no elevation requirement now have one.
The current requirements break down like this:
- New buildings in the 100-year or 500-year floodplain need a lowest floor at least 2 feet above the 500-year flood elevation.
- Critical facilities and buildings in the floodway must be at least 3 feet above the 500-year elevation.
- Residential additions larger than one-third of the existing footprint, and all non-residential additions, must meet the full 500-year plus 2 feet standard.
- Smaller residential additions in the 100-year floodplain need to be 1 foot above the 100-year elevation.
Non-residential buildings can use dry floodproofing instead of raising the floor, which is often the cheaper route for a commercial slab.
Fill is the other big change. Fill placed below the 500-year flood elevation now has to be offset with compensating storage. Before 2018, that requirement applied only in the 100-year floodplain. This “zero net fill” rule is where a lot of site budgets go wrong.
Just outside the city, Harris County is stricter. In the unincorporated county, new buildings in the 100-year floodplain must also sit 2 feet above the 500-year elevation, but fill can no longer be used to raise them. Builders there have to use pier and beam or foundation walls with flood openings instead. Always confirm whether your site is inside city limits, in the unincorporated county, or in another city like Pasadena or Sugar Land, because each has its own rules.
What Elevation Requirements Do to Your Estimate
Raising a building 2 or 3 feet sounds simple. In practice it touches almost every division of the estimate.
Start with the survey, not the floor plan
You can’t price elevation until you know how far the existing ground sits below the required floor height. A lot where natural grade is already close to the 500-year elevation might need only a thicker slab. A lot 3 feet below it needs a completely different foundation. Get a topographic survey and the flood elevations early, and budget for elevation certificates during construction, since the floor height has to be verified.
If you’re developing along a major creek inside city limits, the city also requires a flood study showing the 100-year floodplain under both current and future land use. That’s engineering time and schedule you need to carry.
Foundation choice drives the biggest swing
The common ways to get a building up to the required height each price very differently:
- Raised slab on fill. Often the most familiar option, but inside the city the fill must be offset with compensating storage, and in unincorporated Harris County’s 100-year floodplain it isn’t allowed for elevation at all.
- Stem wall or chain wall foundation. Perimeter concrete or block walls hold the slab up. Expect taller forms, more concrete and rebar, and more labor than a standard slab.
- Pier and beam. Keeps an open area under the building so floodwater can flow through. Adds piers, beams, framing, and flood openings in any enclosed skirting.
- Dry floodproofing (non-residential only). Sealed walls, flood shields, and backflow protection at the ground floor instead of raising it.
Run the numbers on more than one option. The cheapest foundation on paper can be the most expensive once you add fill mitigation and site work.
Compensating storage eats land and budget
Zero net fill means that if you bring in fill below the 500-year elevation, you have to dig out an equal volume elsewhere on the site, also below that elevation. That adds excavation, haul-off, grading, engineering, and sometimes a detention-style basin that takes space away from parking or yard. On a small infill lot, there may simply be no room for it, which pushes the project toward pier and beam or stem walls.
Everything connected to the floor goes up too
When the floor rises, so does everything that meets it. Price longer exterior stairs, taller porches, and extra handrails. On commercial projects, accessible entrances may need longer ramps or a lift. Driveways and sidewalks get steeper or longer. HVAC condensers, water heaters, and electrical equipment usually have to be raised above the flood elevation on platforms. Plumbing and utility connections run farther. None of these items is large on its own, but together they add up quickly on every unit.
Detention and Drainage Costs
Floodplain rules deal with how high you build. Detention rules deal with the extra rainwater your project sends downstream, and they apply whether or not you’re in a floodplain.
Houston’s stormwater requirements live in Chapter 9 of the city’s Infrastructure Design Manual (IDM). The rules have eased a bit recently. A supplement issued on May 16, 2025, replaced the old sliding scale with a flat detention rate of 0.8 acre-feet per acre for projects under 20 acres. It also gives redevelopment sites credit of 0.4 acre-feet per acre for existing impervious cover, and it created a small de minimis allowance for minor improvements. Those changes were folded into the 2026 edition of the IDM, which applies to projects submitted on or after June 1, 2026.
Here’s what that means for your estimate.
Commercial and multifamily sites
Most non-residential projects need on-site detention. The volume depends on how much new impervious surface you create, which includes roofs, paving, sidewalks, and foundations. The redevelopment credit can shrink that volume a lot on an old site that was already paved, so check what’s there before you price a detention system.
On tight urban lots, detention usually ends up underground. Underground storage pipes or vaults, restrictor structures, outfall connections, and extra excavation can be one of the most expensive items on a small commercial job. Houston BOMA specifically pushed for the redevelopment credit because underground detention costs were blocking projects on previously developed land.
Townhomes and small-lot residential
Single-family lots of 15,000 square feet or less have generally been exempt from detention when impervious cover stays at or below 65%. Shared driveways change that. When lots are served by a shared driveway, access easement, or courtyard drive, detention and additional drainage requirements typically apply, including a shared subsurface drainage system and outfall. That catches a lot of townhome developers off guard.
Who receives the water matters
The jurisdiction that directly receives your stormwater sets the drainage criteria. If your site drains into a Harris County or TxDOT system, their rules may govern instead of the city’s. Confirm the outfall early, because it can change the design and the cost.
No Zoning Doesn’t Mean No Rules
Houston is the largest US city without traditional zoning, so there are no use districts or rezoning hearings. That doesn’t mean a site is wide open. Several other layers control what you can build, and each one affects cost.
Chapter 42: Houston’s development ordinance
Chapter 42 of the city code covers platting, minimum lot sizes, building lines (setbacks), and related development standards. It’s the closest thing Houston has to a zoning code. A 1998 revision cut the minimum lot size in the urban core from 5,000 square feet down to 1,400 square feet, which is a big reason inner-loop neighborhoods filled up with townhomes.
If you’re splitting a lot, platting has to be done before building permits are issued on the new lots. That means survey and platting costs, plus waiting time, before any vertical work begins.
Livable Places opened up new housing types
The city’s Livable Places amendments took effect on November 27, 2023. They were written to encourage smaller, neighborhood-scale housing, and they matter for residential estimators:
- Second dwelling units can now be up to 1,500 square feet, up from 900, with parking based on unit size.
- Small multi-unit buildings of 3 to 8 units are allowed again, with height limits to fit neighborhoods.
- Courtyard-style developments cluster homes around shared open space and parking.
- Narrow-lot developments use rear or shared access instead of a driveway for every lot.
These options create more project types to price, but they bring the same issues discussed above. Shared driveways can trigger detention, and every unit in a floodplain still has to meet the elevation rules.
Deed restrictions often act as the real zoning
In many established neighborhoods, private deed restrictions do the job zoning does elsewhere. They can limit a lot to single-family use, block subdivision, set minimum lot sizes, or require specific setbacks and architectural standards. Where a deed restriction sets a deeper setback than Chapter 42, the deed restriction controls. The Livable Places changes don’t override active deed restrictions either.
Houston is also unusual because the city itself helps enforce deed restrictions through its Legal Department. On top of that, neighborhoods can apply for special minimum lot size or special minimum building line designations that are stricter than the citywide rules.
For an estimator, deed restrictions can change the footprint, the number of units, exterior materials, and even whether the project happens at all. Get them reviewed before pricing anything in detail.
Parking and historic districts
Off-street parking requirements add paving, and paving adds impervious cover, which adds detention. If the site is in a historic district, expect design review, material restrictions, and a longer approval timeline. Both can quietly add cost to what looked like a simple infill job.
New Flood Maps Are on the Way
The flood maps most Houston projects are permitted against today date back to 2007 and were built on data gathered after Tropical Storm Allison in 2001. That’s about to change.
In February 2026, FEMA released draft floodplain maps for Harris County and Houston through the MAAPnext project. It’s the first countywide update since 2007. The new maps use Atlas 14 rainfall data gathered after Harvey, along with updated topography and modeling, and they reflect rainfall rates more than 30% higher than before.
Some neighborhoods are coming out of the floodplain because of flood control projects built over the past several years. Many more properties are being added. One industry estimate puts the number of properties newly designated high risk at more than 170,000.
For now, the draft maps are not regulatory. They’re shared for awareness and technical review, and a Harris County update to Commissioners Court suggested the final, effective maps may not arrive until around 2028 or 2029.

So why should an estimator care today? A few reasons:
- Owners and lenders are already looking at them. A client may decide to build higher than the current minimum to protect insurance costs and resale value, and that changes your foundation price.
- Long projects can cross the line. A multi-phase development that starts under the old maps could have later phases permitted under the new ones.
- Drainage criteria already use the new rainfall data. Harris County and local jurisdictions have already adopted Atlas 14 rainfall for stormwater design, so detention and storm sewer sizing reflect the heavier rainfall numbers even before the maps change.
When a site is near the edge of a floodplain, check both the current effective map and the draft map. Then note in your bid which one your elevation assumptions are based on.
A Practical Estimating Checklist for Houston Projects
- Confirm the jurisdiction: City of Houston, unincorporated Harris County, or another city. Each has different floodplain and drainage rules.
- Check the site against both the current effective flood map and the MAAPnext draft map.
- Get a topographic survey and the 500-year flood elevation, then calculate how far the finished floor has to rise.
- Price at least two foundation options, and include fill mitigation or compensating storage where it applies.
- Calculate new impervious cover, including parking and shared driveways, and estimate detention volume. Apply any redevelopment credit.
- Confirm where stormwater outfalls, since the receiving jurisdiction sets the drainage criteria.
- Pull deed restrictions and check for special minimum lot size or building line designations, historic districts, and platting needs.
- Add elevated equipment platforms, longer stairs and ramps, elevation certificates, and extra utility runs as line items.
- Write your assumptions into the bid, especially the flood map, flood elevation, and detention volume you used.
That last step matters more in Houston than almost anywhere else. When a map, rule, or survey changes mid-project, clear assumptions give you grounds for a change order instead of absorbing the cost.
Getting the Numbers Right Before You Bid
Houston projects rarely go over budget because someone priced the drywall wrong. They go over because the floor had to be 30 inches higher than planned, the fill needed mitigation, or a shared driveway triggered detention nobody carried in the bid.
That’s the kind of detail Digital Estimating is built to catch. Our construction cost estimating services support general contractors, subcontractors, and material suppliers across the US on residential, commercial, and public bids. Our estimators work from your drawings, civil plans, and specifications in PlanSwift and Bluebeam. You get an Excel estimate with material and labor quantities and pricing, organized division by division, so foundation, sitework, and detention costs are easy to review. We sign an NDA before work begins, and most projects are delivered in 3 to 12 working days depending on size and complexity.
If you’re looking for a construction cost estimator Houston contractors can count on for floodplain and detention-heavy projects, send us your plans for a free quote. You can also request a sample estimate first to see the level of detail we provide.
Frequently Asked Questions
How high does a new building have to be in a Houston floodplain?
Inside city limits, new buildings in the 100-year or 500-year floodplain need a lowest floor at least 2 feet above the 500-year flood elevation. Critical facilities and buildings in the floodway need 3 feet above the 500-year elevation.
Can I use fill to raise a building in Houston?
Inside the city, fill placed below the 500-year flood elevation has to be offset with compensating storage on the site. In unincorporated Harris County’s 100-year floodplain, fill can’t be used to elevate a building, so builders use pier and beam or foundation walls with flood openings instead.
Do additions have to meet the floodplain elevation rules?
Often, yes. Residential additions larger than one-third of the existing footprint, and all non-residential additions, must meet the 500-year plus 2 feet standard. Smaller residential additions in the 100-year floodplain need to be 1 foot above the 100-year elevation.
How much detention does a commercial project in Houston need?
For projects under 20 acres, the city uses a flat rate of 0.8 acre-feet of detention per acre, based on new impervious cover. Redevelopment sites can get credit for existing impervious cover, which can reduce the required volume significantly.
Does Houston really have no zoning?
Houston has no traditional use zoning, but Chapter 42 sets lot sizes, building lines, and platting rules. Private deed restrictions, which the city helps enforce, often control land use in established neighborhoods.
Do Houston townhomes need detention?
They often do. Single-family lots of 15,000 square feet or less have generally been exempt when impervious cover stays at or below 65%, but projects using a shared driveway or courtyard access typically trigger detention and additional drainage requirements.
Are the new FEMA flood maps for Houston in effect?
Not yet. Draft maps were released in February 2026, but they aren’t regulatory. Final effective maps are estimated around 2028 or 2029, so check both the current and draft maps for sites near a floodplain boundary.
Can Digital Estimating price sitework, detention, and elevated foundations?
Yes. Send us your architectural and civil drawings, and we’ll include foundation, earthwork, and detention quantities and pricing in the estimate. Plan review before you order is free.

Streaming boxes, compact disc transports, televisions, converters, and network players still need clean signal paths between components. While wireless playback is convenient, many serious listening rooms depend on wired links for stable timing and lower noise exposure.
A coaxial connection can be simple, affordable, and precise when the source and converter both support it. That makes it worth another look for anyone refining a two-channel system or home theater rack this year.
The Case for Coaxial Audio
A proper 75-ohm connection helps move encoded sound from one device to another with controlled impedance. That matters because timing errors can affect how a converter rebuilds the analog signal. For systems using a disc transport, streamer, or television output, an audio coaxial cable can provide a direct electrical path that avoids some limits of optical links.
Coaxial audio uses voltage rather than light. That gives it different strengths than fiber optical formats. It can support strong bandwidth, firm connector contact, and reliable transfer across typical room distances. The result is not magic; it is basic signal management, where geometry, shielding, plugs, and impedance all shape performance.
Why Timing Still Matters
Digital sound is built from samples. Each sample must reach the converter in a steady sequence. If clock recovery becomes less stable, the converter may produce subtle distortion, softer edges, or flatter imaging. This issue is often called jitter, and it remains relevant in modern playback chains.
A better cable cannot repair a weak source or poor converter design. Still, it can reduce one source of stress in the link. Lower noise pickup and consistent impedance help the receiving device interpret the stream with less correction. In revealing systems, those small gains can accumulate.
Coaxial Versus Optical
Optical cables have real advantages. They provide electrical isolation, which can help break ground loops. They also work well for televisions, soundbars, and simple media setups. For many casual rooms, optical audio is practical and clean.
Coaxial links are different. They often use stronger connectors, and their electrical format can be friendlier to some converters. Many listeners prefer coaxial between a transport and a separate converter because it can sound firmer and more open. The better choice depends on the equipment, cable length, and noise conditions near the rack.
Build Quality Counts
The term “coaxial” describes a structure, not a quality level. A basic cable and a carefully built one can both carry the same signal format. Their behavior may still differ under real use.
Shielding is a key factor. It helps block interference from power cords, wireless routers, amplifiers, and nearby screens. Conductor material, insulation, plug fit, and internal geometry also matter. A loose connector or poorly controlled impedance can weaken an otherwise capable link.
Length deserves attention as well. Very long runs can add loss. Very short runs may create reflection issues in some systems. For most home setups, a sensible length that reaches without strain is the right choice.
Where Coaxial Fits Best
Coaxial audio is useful between a compact disc transport and a converter. It also suits streamers, media players, televisions, and some professional-style interfaces. Many integrated amplifiers and receivers include a coaxial input because the format remains dependable.
It is also helpful during upgrades. A listener can keep a familiar source, then add a better converter later. The cable becomes the bridge between old and new gear. That keeps the system flexible without forcing a full replacement.
Practical Buying Tips
Check the connectors first. Most consumer gear uses RCA-style coaxial sockets. Some equipment may use BNC, which offers a tighter impedance match when both components support it.
Next, look for a true 75-ohm rating. Ordinary analog interconnects may fit the jacks, but they are not always built for this signal type. Cable routing also matters. Keep the line away from power strips, wall adapters, and bundled mains cords.
Finally, match the purchase to the system. Entry-level setups do not need exotic spending. More revealing systems can justify better shielding, tighter construction, and higher-grade connectors. The goal is balance, not excess.
Conclusion
Digital coaxial cables still matter because audio quality depends on more than file resolution or streaming service choice. The link between source and converter affects timing, noise exposure, and system flexibility.
Optical, USB, and network options all have a place, but coaxial remains a practical wired format for many rooms. With correct impedance, solid shielding, and sensible length, it can support cleaner playback without making the setup harder to use.

Metal fabrication shops rely on repeatable cuts, accurate holes, clean bends, and safe material handling. Throughput, finish quality, and operator fatigue are impacted by the right equipment on a shift-by-shift basis. A well-chosen setup also reduces rework because each station performs a clear task within its rated capacity.
Eight tools deserve special attention in a practical shop: an ironworker, a cold saw, a band saw, a press brake, a hydraulic press, a belt grinder, a pipe notcher, and a measuring system. Together, they cover most routine metalwork.
Material preparation sets the pace for downstream work. A shop benefits from equipment matched to its stock sizes, thickness ranges, and daily volume. For teams comparing professional tools for ironworkers, the key questions involve force, tooling access, alignment, and changeover time. Those factors determine whether an ironworker remains a useful production station or becomes a bottleneck during busy orders.
1. Ironworker
An ironworker combines punching, shearing, notching, and angle cutting in one machine. Its value comes from station versatility, but capacity must match the material schedule. Operators should check maximum punch diameter, stock thickness, throat depth, and available dies.
Separate work areas, proper guarding, and aligned tooling help maintain clean holes while limiting setup delays and unsafe adjustments. A labeled drawer keeps punches and dies organized, reducing selection errors between jobs.
2. Cold Saw
A cold saw produces square cuts with limited heat distortion, making it useful for tubing, bars, and structural sections. Blade selection should follow material type, tooth count, and section geometry. A solid vise and controlled feed improve cut consistency.
Shops should reserve coolant and chip management for applications that require them, then inspect burrs before welding or assembly. The operator should confirm blade condition before starting each production run.
3. Band Saw
Band saws handle long stock and larger profiles that may exceed a circular saw’s practical range. Variable speed, blade pitch, and guide adjustment affect both blade life and cut quality. A stop system supports repeat lengths, while roller support prevents stock from twisting.
Regular tracking checks also reduce wandering cuts and premature blade wear. Coolant, chip brushes, and scheduled blade changes protect finish quality during extended runs.
4. Press Brake
A press brake forms plates, channels, and brackets with controlled force and repeatable angles. Its useful range depends on tonnage, bed length, tooling, and material thickness. Operators should calculate bend allowance before cutting blanks, then verify the first piece with an angle gauge.
Backgauges and squaring arms help keep production parts consistent across batches. Tooling faces should remain clean, since debris can change the finished angle.
5. Hydraulic Press
Hydraulic presses apply concentrated force for straightening, forming, bearing removal, and fixture work. A pressure gauge helps operators stay within rated limits, while properly sized plates distribute force across the workpiece. The frame, ram, hoses, and pins need routine inspection.
Blocks must sit level and support the load fully, since unstable setups can shift suddenly under pressure. A return stop improves repeatability when several pieces require the same correction.
6. Belt Grinder
A belt grinder removes weld spatter, smooths edges, and prepares joints faster than hand filing. Coarse belts remove stock quickly, while finer grades refine the surface before coating. Contact wheels suit curved work, and platen surfaces support flat edges.
Dust collection, eye protection, and a maintained spark path are essential for controlled finishing. Belts should be changed before glazing causes excess pressure and heat.
7. Pipe Notcher
Pipe notchers create accurate saddle cuts for handrails, frames, and tubular assemblies. The correct die or abrasive setup should match outside diameter, wall thickness, and joint angle. A consistent clamping method prevents slipping and uneven gaps. After notching, a quick fit-up check reveals alignment issues before welding, saving filler material and correction time during final fit-up.
8. Measuring System
Measurement controls every preceding operation. A basic kit should include steel rules, squares, calipers, angle finders, and reliable marking tools. Higher-volume shops may add digital stops or positioning tables for repeat lengths.
Calibration checks should follow a simple schedule, with reference pieces used to confirm accuracy. Clear readings reduce scrap before expensive fabrication stages.
Conclusion
A productive fabrication shop does not need every available machine, but it does need complementary capabilities. Punching, cutting, forming, pressing, finishing, notching, and measurement cover a broad share of daily work. Selection should reflect stock, tolerances, production volume, and operator skill.
When each station has suitable capacity and maintained tooling, material moves with fewer delays, parts fit more predictably, and the shop gains dependable output without unnecessary equipment spending.

A fuel tank sticker’s purpose goes beyond just identifying the container. They help drivers, technicians, inspectors, and property owners make quick decisions around storage, filling, service, and emergency response.
The last thing you need is for a label to be unclear or missing at the worst possible time. Strong compliance starts with clear, durable information placed where people can see it. These seven details help keep tanks traceable, serviceable, and aligned with common safety expectations.
1. Fuel Type
Every tank label should state the fuel type in plain language. This detail helps prevent cross-filling, wrong deliveries, and unsafe handling. Diesel, gasoline, heating oil, kerosene, and propane each carry different storage and handling concerns. Clear wording matters more than clever design.
For tanks exposed to weather, fuel vapor, and frequent handling, durable fuel tank stickers should keep fuel type, warning text, and service details readable over time. A faded label can fail during inspection and can also slow field decisions during delivery, maintenance, or emergency response.
2. Hazard Warning
A tank sticker should show the main hazard in direct terms. Flammable contents, no smoking, restrictions on ignition sources, vapor danger, and pressurized contents are common cautions. The tank and fuel being stored should be reflected in the wording.
Warnings work best when they are short and visible from the normal approach point. Small text placed behind piping or under a lid may meet no practical need. Inspectors and crews should not have to search for basic risk information.
3. Tank Identification Number
Each tank should carry a unique identification number. This number links the physical tank to records, service history, delivery logs, inspection notes, and customer accounts. Without it, staff may rely on location alone, which can create errors on busy sites.
A good identification number should be easy to read and consistent with internal records. It should not change unless the tank is replaced or formally renumbered. Consistency helps teams compare field notes against office records without guesswork.
4. Capacity and Product Limits
Tank capacity should appear clearly on the sticker. This helps delivery staff avoid overfilling and supports accurate ordering. Emergency personnel who must estimate stored volume during an incident can also be guided by capacity.
Labels should also note any important limits. These may include maximum fill level, approved product type, or special handling restrictions. The goal is to make the tank’s safe use clear before anyone opens a valve or starts a transfer.
5. Owner and Emergency Contact
A compliant sticker should identify who owns, manages, or services the tank. It should also show a current phone number for service or emergency contact. This is especially useful for leased tanks, unattended locations, and multi-tank properties.
Contact details should be reviewed often. A phone number that no longer works gives a false sense of control. If ownership changes, stickers should be replaced quickly so field records and visible markings remain aligned.
6. Inspection and Service Dates
Inspection dates belong on or near the tank. A sticker can show the last inspection, next required check, requalification date, or service visit. This supports accountability and helps crews spot overdue work before it becomes a compliance issue.
Date fields should be simple and large enough for field writing. Smudged handwriting, tiny boxes, or weak ink can make the record useless. Labels used outdoors should support permanent markers or printed entries that resist moisture and sun.
7. Placement and Durability Details
Compliance is not only about printed words. The sticker must stay attached and readable in real conditions. Fuel tanks face rain, sun, dirt, abrasion, cold, heat, and chemical exposure. A weak label can peel before the next inspection.
Placement also matters. Labels should sit on clean, visible surfaces away from seams, heavy wear points, and areas likely to collect grime. The best location is usually near the fill point or normal service approach, where crews already look first.
Conclusion
A fuel tank sticker is a tiny item that plays a big part in compliance. It should identify the fuel, warn about hazards, connect the tank to records, show capacity, list contacts, track service dates, and remain readable outdoors. These details help reduce errors and support safer work.
Regulations can vary by fuel type and location, so every operation should review label content against current local requirements before ordering or replacing stickers.
-

 NEWS1 year ago
Historical Churches in Manila
-

 TOPIC2 months ago
Unveiling AvTub: Your Ultimate Guide to the Best AV Content
-

 TOPIC1 year ago
Symbols of Hope: The 15th Belenismo sa Tarlac
-

 TOPIC1 year ago
RIZAL at 160: a Filipino Feat in Britain
-

 TOPIC1 year ago
“The Journey Beyond Fashion” – Ditta Sandico
-

 TOPIC1 month ago
Understanding Fascisterne: Origins and Ideological Roots
-

 TOPIC1 year ago
Simbang Gabi and Kakanin
-

 TOPIC1 year ago
5 Must-Have Products From Adarna House to Nurture Your Roots