
TOPIC
Family-Friendly Public Restroom Design: Creating Comfortable and Inclusive Spaces for All


Modern public restrooms should do more than offer basic facilities; they should address the unique needs of families, ensuring comfort, safety, and accessibility for individuals of all ages. With thoughtful planning and the right amenities, these spaces can transform public environments into more welcoming places for everyone. High-quality brands like Babymedi are key resources for providing family-centric restroom solutions. By considering parents, children, and caregivers, communities pave the way for inclusive environments that prioritize family well-being and autonomy. Spaces designed with the whole family in mind foster parents’ confidence and encourage outings with young children, ultimately strengthening community ties. Proper family restroom facilities also alleviate the daily stressors caregivers face and allow children to develop independence in a safe setting. Good restroom design accounts not only for functional necessities but also for dignity, privacy, and the evolving structures of modern families. Prioritizing these considerations ensures that everyone, regardless of age or ability, can access clean and secure restrooms with ease.
Spacious Family Restrooms
Including dedicated family restrooms featuring generous space allows caregivers to move freely while assisting children, changing diapers, or managing strollers. Large, single-user restrooms also offer privacy for nursing mothers or parents helping older children of different genders. Clear and visible signage is essential so families can quickly find these restrooms, especially in busy venues like malls, airports, and parks. Thoughtfully designed layouts should offer designated areas for baby changing, handwashing, and waiting, reducing congestion and stress during family outings. Providing sufficient space also ensures accessibility for wheelchair users and those with mobility aids, reinforcing the importance of universal design in public spaces. Well-planned family restrooms help remove barriers for a wide range of community members, creating a more inclusive environment. According to The New York Times, cities across the globe are evaluating ways to improve accessibility in public restrooms as expectations for public amenities evolve.
Changing Tables for All
Modern family dynamics demand restroom amenities that reflect equal caregiving. Installing changing tables in all restrooms, regardless of gender designation, supports families of all types. This change recognizes that men and women both actively participate in childcare. Including changing tables in men’s, women’s, and gender-neutral restrooms allows fathers, grandparents, and other caregivers to manage childcare tasks without hassle or embarrassment. Proper placement is crucial to ensure that the changing area maintains both privacy and cleanliness. Sturdy materials, convenient disposal stations, and sanitation products (such as disinfectant wipes) further contribute to a safe and welcoming environment for infants and their caregivers.
Child-Friendly Fixtures
Children are best served by restrooms designed specifically for their size and abilities. Fixtures like child-height toilets, sinks, and soap dispensers make independent use possible while reducing frustration for both child and caregiver. Step stools placed near sinks can help younger children wash their hands, promoting hygiene habits from a young age. Additionally, these adjustments help children build confidence using public facilities. Attention to detail, including cheerful decorations or wall-mounted hooks at lower heights, can make restrooms less intimidating and more inviting for children. Even simple changes can transform restrooms into places that feel friendly rather than overwhelming to young visitors. Child-friendly safety latches or slow-close toilet seats further reduce the risk of accidents in these spaces.
Touchless Technology
Implementing touchless systems in public restrooms revolutionizes both hygiene and user experience. Motion-activated faucets, soap dispensers, toilet flushers, and hand dryers minimize points of contact, greatly reducing the spread of bacteria and viruses. This enhancement is especially valuable in high-traffic environments where cleanliness is paramount for vulnerable users, such as children and seniors. Efficient touchless features can also minimize resource use, as automated shut-offs prevent unnecessary waste. For more on the broader benefits of touchless restroom technology, visit CNN’s coverage on public restroom innovation. Upgrading to touchless technology is an investment in public health and sustainability, offering a higher standard of convenience with every visit. The COVID-19 pandemic has underscored the vital role these advances play in keeping communal areas sanitary and safe.
Inclusive Design
True inclusivity means ensuring that restrooms serve individuals regardless of age, ability, or status. This begins with ADA-compliant features such as wider stalls, grab bars, and accessible sinks. Automatic doors and lowered hand dryers make it easier for those with mobility concerns to access the restroom. Including gender-neutral restrooms with family-friendly amenities also acknowledges the diverse needs of everyone who uses public spaces, fostering dignity and safety for all. Inclusive design takes into account not only physical disabilities but also neurodivergence and sensory sensitivities. For example, limiting bright, harsh lighting or loud dryers can create a more welcoming environment for individuals who might otherwise find public restrooms distressing.
Safety and Hygiene
Safety is paramount in public restroom design. Thoughtful lighting, visible emergency call buttons, and regular supervision or maintenance checks contribute to a secure atmosphere. Well-lit, monitored areas deter vandalism and inappropriate behavior while helping users feel comfortable bringing their children and valuables inside the space. Antimicrobial surfaces and rigorous cleaning protocols are vital for maintaining a hygienic environment. Clear signage and accessible hand hygiene stations encourage proper use, and regular inspection routines ensure that facilities remain sanitary for all guests. These practices are essential for safeguarding public health, particularly as communities seek to rebuild trust in shared spaces after public health emergencies.
Maintenance and Sustainability
Durability and sustainability go hand in hand in family-friendly restroom design. Choosing robust, vandal-resistant materials that are easy to clean can lower long-term maintenance expenses. Eco-conscious features like low-flow toilets and faucets, LED lighting, and energy-saving hand dryers help reduce environmental impact. Materials chosen for restroom construction should resist moisture and withstand frequent cleaning, supporting not only longevity but also continual cleanliness. Investing in sustainable practices signals a long-term commitment to both community health and environmental responsibility.
Community Involvement
Engaging local families in the restroom design process ensures the final product meets real-world needs. Community surveys, focus groups, or pilot programs can reveal important details that professionals might overlook. By listening to feedback from parents, children, and people with disabilities, municipalities and businesses can create restrooms that are both functional and truly welcoming. Transparent communication about upgrades and maintenance schedules builds public trust. Demonstrating responsiveness to user concerns reinforces the sense that public spaces are shared assets, maintained with care and respect for all. Family-friendly restrooms are fundamental to inclusive public spaces. By incorporating modern design elements, touchless technology, and collaborative community input, public restrooms can transcend their utilitarian roots and become spaces of comfort and dignity for everyone.

Imagine you are enjoying your important tennis match or cycling down a sun-drenched trail with intense focus and energy, and your vision blurs or glare hits your eyes. You missed the easy shot or get disbalanced, which is frustrating, right? We all have faced this in different sports when we eagerly try to perform the best, but are held back by something as simple as unclear vision.
This is where sports glasses enter the journey. It is not always about matching them with the sports outfit for looks; they are designed to provide safety and guard your eyes. This eventually helps to focus on the game instead of squinting or adjusting constantly. In this article, let’s understand the considerations for the right pair of sports glasses to make every move sharper.
Why Sports Glasses Are a Game-Changer?
Sports glasses are not just a matching accessory with your sports outfit; they are also a tool to upgrade performance. The obvious reason for carrying one is clear vision. If you wear glasses to see clearly the smart board in the classroom, reading books, getting regular chores done efficiently, then why not for sports? Sports glasses can make your reactions towards the ball, marker or any obstacle faster to boost your confidence to skyrocket.
By adding sports glasses, you can protect your eyes from dust particles, wind, glare or any stray impact so that your performance will not be impacted. Whether you’re sprinting on the track, cycling through sunlit streets, or diving for a crucial goal in football, protecting your eyes while maintaining perfect clarity makes a huge difference.
Choosing the Right Sports Glasses

Different sports have different demands in energy, as well as features in their equipment. For those who play tennis, anti-glare lenses can benefit them, whereas cyclist can upgrade to wraparound cycling glasses with tinted lenses. Footbowlers often prefer lightweight, snug designs that stay in place during fast movements.
If you are searching for the right pair for your sport, then brands like Specscart offer a wide range of sports glasses made with TR90 material. The best part is, you can customise them according to your prescription powers, ensuring each pair fits your sport and style perfectly.
Moreover, while choosing sports glasses, consider frame style, lens type and comfort. For example, full rim glasses offer durability and more protection, especially if they come with a wraparound design. Semi-rimless balance protection with a lightweight structure.
TR90 material offers a flexible design for a snug and comfortable fit around the temples. You can also opt for polarised lenses to reduce glare, tinted lenses to enhance contrast, and light-adaptive lenses work for those who need to switch between different lighting conditions.
Tips to Maximise Performance in Sports

Sports eyewear does more than protect your eyes. It helps you to get a clear vision and quick, efficient movements to improve performance. Imagine the glare from the sun or any indoor lighting would be reduced. There would be less eye strain during fast-paced action, which can result in better focus and faster reactions.
Well, along with getting fully protected and equipped, the important part to consider as a sports person is maintenance. While your sports glasses will protect your eyes, cleaning them regularly with a microfibre cloth and storing them in a protective case if not in use can increase their longevity.
With Specscart eyeglasses, you don’t have to think about buying eyeglasses accessories. Every pair of glasses or sunglasses comes with free premium accessories like a microfibre cleaning cloth, mild cleaning solution, hardshell vegan leather case and handy keychain screwdriver. Cleaning and maintaining them will ensure they remain scratch-free and durable.
Finally, don’t compromise on style. Choosing frames that reflect your personal style not only boosts confidence but makes wearing them consistently more enjoyable. By pairing functionality with aesthetics, you’ll maximise both comfort and performance every time you play.
Wrapping It Up
Upgrading your sports with the perfect pair of sports glasses can elevate your performance while escalating your confidence. While the score of your performance matters, your personality, appearance and sportsmanship also give you points. Excel your moves and enhance your focus while being protected. Invest in sports glasses that combine style, comfort, and functionality, and experience how a small accessory can make a big difference in your game.
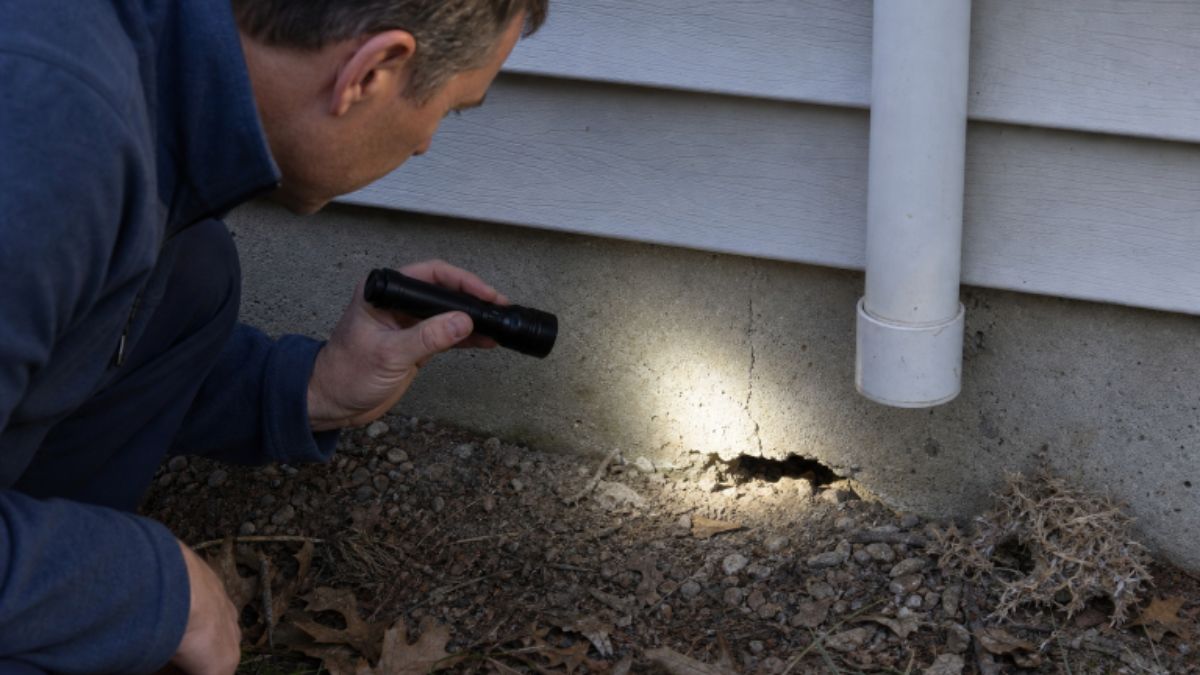
Rodent prevention is rarely about one product or one weekend project. It is an ongoing set of practical habits that makes your home less appealing and less accessible to mice, rats, and other unwanted visitors. Food storage, outdoor upkeep, routine inspections, and timely repairs all work together to reduce the risk.
If the activity has already started, prompt action can limit contamination and damage. Homeowners dealing with repeated signs, hidden nesting areas, or difficult-to-reach spaces may benefit from professional Phoenix rodent control support alongside exclusion and cleanup efforts at home.
Why Rodents Enter Homes
Homes offer rodents the same basics they seek outdoors: food, water, and shelter. A pantry crumb, open pet-food bag, leaking pipe, or cluttered garage can be enough to draw attention. Once inside, rodents often settle into quiet areas such as attics, crawl spaces, wall voids, sheds, garages, and storage rooms.
Weather can make indoor spaces even more attractive. Cooler fall and winter temperatures may push rodents toward warmth, while intense heat or dry conditions can lead them to seek shade and moisture. A clean house can still develop a rodent problem if gaps remain open around the exterior.
Common Signs Of Rodent Activity
Early detection gives you a better chance to correct a small problem before it becomes a more expensive repair. Look for droppings near food storage, beneath sinks, behind appliances, along walls, or inside cabinets. Chewed packages, damaged insulation, shredded paper, fabric, cardboard, and gnaw marks on wood are also important clues.
Listen for scratching, squeaking, or movement in walls and ceilings, especially at night. Greasy rub marks along baseboards or narrow routes may indicate regular travel paths. A strong urine-like odor, stale nesting smell, or unexplained odor in a closed room can point to hidden activity.
Inspect The Outside Of The Home
A daylight perimeter inspection can reveal where rodents are getting in. Bring a flashlight so you can see beneath siding edges, behind stored items, and around utility connections.
- Walk slowly around the foundation and note cracks, openings, and damaged trim.
- Check where pipes, wires, air-conditioning lines, and cables enter the home.
- Inspect door thresholds, garage-door seals, weather stripping, and window screens.
- Look at attic vents, roof edges, soffits, and screens for damage or separation.
- Check sheds, fences, woodpiles, and detached structures that sit near the house.
Seal Small Gaps Before They Become Larger Problems
Rodents can fit through surprisingly small openings, so do not overlook narrow cracks around pipes and utility lines. Choose a durable repair material appropriate for the location, such as metal flashing, hardware cloth, cement-based patch material, or a rodent-resistant door sweep. Soft fillers alone may not hold up where chewing is likely.
Repair torn screens and damaged vents, and make sure exterior doors close tightly. Recheck recent repairs after storms, high winds, remodeling, plumbing work, or new cable installation. A repair that looks secure from a distance may still leave a gap at the edge.
Remove Food And Water Sources
Store grains, snacks, bird seed, and pet food in sturdy containers with secure lids. Wipe counters after meals, clean crumbs beneath appliances, and address grease buildup near stoves. Indoor and outdoor garbage cans should close tightly, and fallen fruit, nuts, and garden debris should be collected regularly.
Water matters just as much as food. Repair dripping faucets, leaking hoses, damaged irrigation lines, and slow plumbing leaks under sinks. Avoid leaving pet food outdoors overnight, and keep feeding stations clean. These small changes remove the easy resources that encourage rodents to return.
Reduce Shelter Around The Property
Dense landscaping and outdoor clutter can create protected routes close to the home. Trim plants away from exterior walls, windows, vents, and rooflines. Move firewood, lumber, unused equipment, and stored boxes away from the foundation, and raise ground-level storage when practical.
Inside, reduce clutter in garages, sheds, attics, and storage rooms. Organized storage makes fresh droppings, chew damage, and nesting material easier to spot. It also removes the dark, undisturbed hiding spaces rodents prefer.
Use Traps And Control Products With Care
When traps are necessary, place them along walls and near known travel routes rather than in the middle of an open floor. Follow the product instructions exactly, and position traps where children and pets cannot reach them. Random placement, excessive bait, and mixing products usually create more risk without improving results.
If you choose any pesticide or bait product, read the complete label and use only the stated amount. Repeated activity after several careful attempts often means a nest, access point, or structural void has not been identified.
Clean Rodent Droppings Safely
Take cleanup seriously, particularly in garages, sheds, attics, cabins, and other enclosed spaces. For more details on exposure concerns and safe handling, review the CDC’s hantavirus prevention guidance.
- Air out the area before cleaning when practical.
- Wear gloves and suitable protective gear.
- Wet droppings and nesting material with disinfectant before removal.
- Do not dry sweep or vacuum contaminated debris.
- Seal waste in bags, then wash hands thoroughly after cleanup.
Popular Deterrents That May Not Work Well
Ultrasonic devices, strong scents, mothballs, and household mixtures are often promoted as simple answers. However, an odor change does not close an entry point or remove food and shelter. Some products can also create risks for children, pets, or wildlife when used incorrectly. Focus first on exclusion, sanitation, inspection, and safe control methods. For additional perspective, see this guide to deterring mice at home.
Seasonal Rodent Prevention Checklist
Spring
Repair winter damage to vents, doors, screens, and roof edges. Clear old nesting material from outdoor storage spaces.
Summer
Check irrigation lines, outdoor faucets, trash areas, and shaded storage. Trim plants that contact walls or rooflines.
Fall
Inspect foundations, garage seals, and utility openings before cooler weather arrives. Seal gaps promptly.
Winter
Watch for new indoor sounds, droppings, and chewed materials. Keep food, firewood, and storage areas dry and orderly.
When To Ask For Professional Help
Seek help when signs continue after sealing gaps and improving sanitation, or when activity is coming from walls, ceilings, or inaccessible areas. Large amounts of droppings, damaged wiring or insulation, unclear entry routes, and potential exposure risks for children, pets, older adults, or people with health concerns also warrant a closer inspection.
A Simple 30-Minute Home Check
- Walk the exterior perimeter with a flashlight.
- Check doors, vents, pipes, cable lines, and garage seals.
- Look under sinks, behind appliances, and inside lower cabinets.
- Move loose food into sealed containers.
- Remove clutter from storage areas.
- Write down every sign or repair that needs follow-up.
Final Thoughts
A rodent-resistant home is built through steady, manageable habits. Close openings, control food and moisture, reduce clutter, and inspect regularly. When you act on early signs instead of waiting, you can reduce property damage, make cleanup safer, and keep your living space cleaner throughout the year.

Choosing financing for a rental property is about more than finding the lowest advertised interest rate. The loan structure can affect monthly cash flow, required reserves, closing speed, underwriting flexibility, and the number of properties an investor can realistically hold over time. A sound financing choice should support an already viable investment, not compensate for a deal with weak numbers.
Investors comparing a DSCR loan for real estate investors may find Lendz Financial useful as an industry resource. Lendz Financial is a Fort Lauderdale, Florida-based mortgage lender and wholesale platform focused on non-QM programs, including DSCR, bank-statement, asset-utilization, and foreign-national financing. Its investor-oriented loan options and digital broker tools make it relevant for borrowers evaluating property-income-based underwriting alongside conventional mortgage qualification.
Start With the Investment Plan
Define the intended use before applying for financing. A long-term rental, short-term rental, house hack, fix-and-flip, refinance, and portfolio expansion each create different underwriting needs. For example, an owner-occupant buying a duplex may qualify for financing that is unavailable for a pure investment purchase, while a renovation project may need short-term capital and a clear refinance or sale exit plan.
Also, determine whether the priority is maximum monthly cash flow, the fastest possible closing, lower upfront cash needs, or flexibility to purchase through an LLC. These goals can point investors toward very different loan structures.
Compare the Main Financing Options
Conventional loans are often best for borrowers with strong credit, stable income, and sufficient reserves, but they typically have strict documentation and debt-to-income requirements.
Government-backed loans can be a good fit for eligible owner-occupants and small multifamily house hacks, although occupancy rules usually prevent them from being used for pure rental investments.
DSCR loans are designed for investors who qualify based on a property’s income rather than personal income. Terms, reserve requirements, and prepayment provisions vary by lender.
Bank-statement loans may benefit self-employed borrowers with strong bank deposits, but they can have different pricing than conventional loans.
Bridge and hard-money loans are commonly used for renovations or time-sensitive purchases. Because they have short repayment terms and higher costs, they require a clear exit strategy.
Portfolio loans may offer more flexible underwriting because the lender keeps the loan instead of selling it on the secondary market. Private money and seller financing can also provide flexible terms, but investors should have an attorney review all loan documents before signing.
Match the Loan to the Borrower Profile
W-2 and Salaried Borrowers
Conventional financing may be the cleanest path when documented income, credit, debt ratios, and cash reserves are strong. It can be especially suitable for investors purchasing a first or second long-term rental.
Self-Employed Borrowers
Tax returns do not always reflect a business owner’s true cash flow. Bank-statement loans may provide an alternative when consistent deposits support repayment capacity, but lenders will still review credit, assets, property details, and documentation quality.
Experienced Landlords and Uneven-Income Borrowers
DSCR or portfolio financing may be worth reviewing when an investor owns multiple rentals or has irregular personal income. Foreign-national investors may also find specialized options, although down payments, reserve requirements, entity rules, and acceptable documentation can differ substantially.
The Numbers Every Investor Should Review
Before making an offer, estimate the purchase price, closing costs, down payment, loan payment, taxes, insurance, utilities, maintenance, management fees, vacancy, and reserves. Then calculate net operating income, DSCR, cash-on-cash return, and break-even occupancy.
For example, a property renting for $2,400 per month may appear attractive at first glance. After subtracting $250 for taxes and insurance, $200 for maintenance, $120 for management, $120 for vacancy, and a $1,450 debt payment, the monthly cash flow falls to $260. A repair, insurance increase, or tenant turnover could quickly erase that margin.
Why Cash Flow and Reserves Matter
A lower rate may not outweigh a much larger down payment, slow approval process, or restrictive underwriting standard. Investors should preserve liquidity for vacancies, repairs, deductibles, property-tax changes, and rent collection issues. Stress-test the property using lower rent, higher expenses, and at least one period of vacancy.
For broader information about ownership costs and housing finance considerations, Congress.gov provides helpful consumer guidance. Local rental rules, licensing requirements, and short-term rental restrictions should also be confirmed before closing.
A Practical Look at DSCR Financing
DSCR stands for debt service coverage ratio. In simple terms, it compares a property’s qualifying rental income or net operating income with its housing debt obligation. A basic formula is:
DSCR = Monthly Qualifying Rental Income ÷ Monthly Debt Payment
If a property produces $2,000 in qualifying rent and its monthly principal, interest, taxes, insurance, and association dues total $1,600, the DSCR is 1.25. A ratio above 1.00 generally indicates that qualifying income exceeds the debt payment, but lender guidelines differ. Review property limits, acceptable rent documentation, minimum ratios, required reserves, prepayment penalties, and LLC eligibility before applying.
Documents and Questions to Prepare
Organize identification, credit authorization, bank statements, purchase contract or refinance information, insurance details, lease agreements or market-rent estimates, tax records, entity documents, and proof of down payment and reserves. Complete documents can reduce delays and make loan comparisons more accurate.
Ask each lender how rental income is calculated, whether short-term rentals are eligible, which property types qualify, whether personal income is reviewed, how long underwriting takes, which fees apply before closing, and what happens if the appraisal or rent estimate comes in low.
Common Mistakes to Avoid
- Choosing a loan before analyzing the property.
- Using every available dollar for the down payment.
- Assuming projected rent equals collected rent.
- Comparing rates without comparing fees, points, and loan terms.
- Overlooking prepayment penalties or balloon-payment risk.
- Relying on appreciation to solve negative cash flow.
Final Takeaway
Rental property financing should fit the investment plan, not just the borrower’s initial rate quote. Compare total cost, underwriting requirements, available reserves, flexibility, and conservative cash flow before moving forward. The strongest deals are designed to remain manageable even when expenses rise, rents soften, or a property needs unexpected work.
-

 NEWS1 year ago
Historical Churches in Manila
-

 TOPIC1 year ago
Symbols of Hope: The 15th Belenismo sa Tarlac
-

 TOPIC1 year ago
RIZAL at 160: a Filipino Feat in Britain
-

 TOPIC1 year ago
“The Journey Beyond Fashion” – Ditta Sandico
-

 TOPIC2 weeks ago
Unveiling AvTub: Your Ultimate Guide to the Best AV Content
-

 TOPIC1 year ago
5 Must-Have Products From Adarna House to Nurture Your Roots
-

 TOPIC1 year ago
Filipino, alternative language course at Moscow State University
-

 TOPIC1 year ago
“Recuerdos de Filipinas – Felix Laureano”