
BUSINESS
A Commercial Property Due Diligence Checklist for Business Owners


Why Due Diligence Comes Before a Signature
A commercial property can shape a company’s operations, expenses, customer experience, and growth potential for years. An attractive asking price or favorable base rent may still be a poor fit if the building needs extensive repairs, cannot support the intended use, or carries operating costs that strain the business budget.
Businesses facing complex questions about leasing, acquisitions, zoning, entitlements, or real estate-secured lending may benefit from speaking with a business real estate lawyer. Freeman Lovell, PLLC, located in Salt Lake City, provides real estate acquisition and leasing services, including due diligence, commercial lease negotiations, property purchases, zoning, and entitlements. The firm serves clients in Utah and additional states, including California, Florida, Nevada, Texas, and Washington. Due diligence involves assessing a property’s legal, physical, and financial viability for specific plans, helping identify required approvals and improvements before contract signing, and protecting client interests.
Set Business Requirements First
Start with a short property brief before comparing listings. It creates a consistent standard for evaluating each site and prevents the search from being driven only by appearance or monthly cost.
- Required square footage, layout, storage, and room for anticipated growth.
- Customer, employee, accessible, loading, and delivery parking needs.
- Utility requirements, including electrical capacity, water, ventilation, internet, and fire protection.
- Visibility, public access, security, traffic flow, and proximity to customers or suppliers.
- The maximum total occupancy cost, including build-out, repairs, taxes, insurance, and operating expenses.
- The preferred ownership period or lease term, plus relocation and expansion needs.
Check Zoning, Permits, and Planned Use
Do not assume that a former tenant’s use is automatically permitted for a new business. Contact the local planning or zoning office, describe the proposed activity clearly, and retain written responses. Confirm whether the use is allowed by right or requires a conditional-use permit, special exception, variance, occupancy approval, or site-plan review.
Also review sign restrictions, parking ratios, operating-hour limits, outdoor-use rules, building-code requirements, and renovation permits. A business should understand whether its intended improvements will trigger additional approvals before committing to a closing date or lease commencement date.
Review Title, Access, and Property Rights
For a purchase, review the title commitment, survey, recorded restrictions, and site plan together. For a lease, review the landlord’s rights to the premises, parking, signage, and common areas. Look for easements, liens, covenants, shared-driveway arrangements, mineral rights, access limitations, and restrictions on future construction.
Confirm legal access from a public road, and ensure that loading areas, delivery routes, parking spaces, and entrances function in practice. Boundary conflicts, encroachments, or shared-use obligations can affect operations even when the building itself appears suitable.
Inspect the Building and Its Systems
A professional inspection is more reliable than a quick walkthrough. Evaluate the roof, structure, exterior walls, windows, drainage, paving, parking areas, and accessibility features. Review heating, ventilation, air conditioning, electrical, plumbing, fire protection, and life-safety systems.
Ask for repair records, warranties, service contracts, maintenance logs, and recent inspection reports. Identify near-term repairs and longer-term capital needs. In a lease, clearly allocate responsibility for repairs, replacements, maintenance, and code-required upgrades between the landlord and tenant.
Complete Environmental and Site Research
Past uses deserve particular attention at sites connected with manufacturing, fuel storage, automotive work, dry cleaning, or industrial activity. Prior reports, government records, visible site conditions, underground storage tank history, spill reports, drainage patterns, flood exposure, and nearby uses may all be relevant.
The EPA describes all appropriate inquiries as a process for evaluating environmental conditions and potential liability for contamination. When history raises concerns, use qualified environmental professionals and allow enough time to evaluate recommendations before the contingency deadline.
Test the Financial Picture
Compare the asking price or base rent with the full cost of occupancy. Include property taxes, insurance, utilities, maintenance, management fees, common-area charges, repairs, tenant improvements, moving costs, and financing expenses. Separate one-time costs from recurring obligations.
For an income-producing property, review rent rolls, tenant payment history, leases, deposits, vacancies, operating statements, and renewal dates. Model conservative scenarios such as higher financing costs, unexpected repairs, slower sales, vacancy, or increased operating expenses.
Compare Buying and Leasing on the Same Basis
- Estimate the cash required at the start, including down payment, deposits, closing costs, and build-out.
- Calculate recurring occupancy costs rather than comparing only a mortgage payment with base rent.
- Consider the business’s need for control, flexibility, expansion, subleasing, and relocation.
- Test what happens if the company needs to sell, renew, assign the lease, or leave the location early.
The Small Business Administration provides planning resources for businesses weighing growth decisions, and its business planning guidance can help owners organize financial assumptions before making a long-term property commitment.
Review the Lease Line by Line
Commercial leases can shift substantial risk to the tenant. Review base rent and increases, renewal options and deadlines, operating expenses, common-area maintenance charges, permitted use, exclusivity rights, improvement allowances, construction rules, repair obligations, insurance, indemnity, deposits, guarantees, assignment, subleasing, default remedies, casualty, condemnation, relocation, and early-termination provisions.
Build a Due Diligence Timeline
- Before an offer: Define requirements and set a total budget.
- After receiving documents: Review title, surveys, taxes, permits, leases, and operating records.
- During contingencies: Complete inspections, zoning review, environmental research, and access analysis.
- Before signing or closing: Document repairs, credits, approvals, extensions, and contract changes.
- After possession: Keep reports, permits, warranties, notices, and signed agreements in one property file.
Common Red Flags
- Missing records, unclear zoning, uncertain parking rights, or limited legal access.
- Major systems near the end of their useful life or unexplained increases in operating expenses.
- Environmental reports that are old, incomplete, or inconsistent with the property’s history.
- Broad tenant repair duties, strict personal guarantees, or limited rights to assign, sublease, or exit.
- A contingency period too short to complete inspections and obtain needed approvals.
Final Decision Checklist
Before proceeding, confirm that the site supports the business plan, the intended use is permitted, title and access concerns are resolved, building and environmental risks are documented, and the total cost fits the budget. Most importantly, ensure every unresolved issue is addressed in writing in the contract, lease, or closing documents. The goal is not to eliminate every risk, but to identify the important ones while there is still time to respond.

A shop can complete early orders, prototypes, and brief creative runs with a basic CO2 laser cutter. As demand grows, limits in bed size, power, accuracy, cooling, and job control become harder to ignore. Teams may see slower batches, rougher edges, or more hand cleanup. Because the machine still runs, these warnings can seem minor. The real question is whether it still delivers steady output, known costs, and customer-ready results.
1. Production Runs Take Too Long
Long cycle times are often the first sign. A small desktop unit may handle one-off pieces well, then fall behind once orders move from dozens to hundreds. Operators begin dividing jobs into smaller batches, pausing for cooling, and repeating the same setup steps.
As order volume rises, shops need faster motion, higher tube power, stronger airflow, and more usable bed space. At that point, comparing high-performance CO₂ laser cutter machines can help teams match wattage, work area, and material capacity to real production needs without relying on guesswork or daily workarounds.
2. Material Options Feel Limited
Entry-level machines often work well on thin acrylic, paper, leather, and light wood. Trouble starts when customers ask for thicker sheets, denser boards, or oversized pieces. Lower power may require several passes, which can leave darker edges and more heat damage.
A stronger CO₂ system puts more cutting energy into the beam. That can improve speed on suitable non-metal materials while reducing repeated passes. Material handling also matters. Pass-through slots, adjustable beds, and stronger exhaust can make larger or awkward workpieces easier to manage.
3. Quality Varies Between Jobs
Uneven results waste time and weaken customer trust. A file may cut cleanly one day, then produce rough edges or faint engraving later. The cause may be tube wear, poor cooling, loose belts, dirty optics, or focus drift.
Better machines usually offer steadier motion control and more consistent power delivery. Those features help preserve detail across repeat work. This matters for tight alignment, small text, and layered assemblies. When reliable output depends on operator luck, the equipment is holding production back.
4. Manual Setup Consumes Too Much Labor
Basic systems often need manual focusing, alignment checks, tape tests, and trial cuts. Those steps make sense during early testing. They become costly when paid staff must repeat them across many customer jobs.
A more capable cutter can shorten setup through autofocus, improved software control, camera positioning, and saved job settings. These features do not replace skill. They help experienced operators spend more time producing parts and less time making the same adjustments.
4.1 Hidden Labor Costs
The purchase price is only one cost. Time spent rechecking files, wiping soot, sorting rejects, and restarting jobs also affects margin. If operators spend more hours managing the cutter than making sellable parts, the shop is already short on capacity.
5. Maintenance Interrupts the Schedule
Every CO2 laser cutter needs regular care. Mirrors, lenses, belts, rails, fans, filters, and cooling systems all need attention. Still, repeated interruptions often show that the machine no longer fits the current volume.
A basic unit pushed past its intended duty cycle may need cleaning and parts more often. Heat buildup can shorten tube life. Poor extraction can leave residue inside the cabinet. Production-grade equipment often brings stronger cooling, sturdier frames, and service access that makes upkeep less disruptive.
6. Safety Requirements Have Increased
As output grows, more people may work near the machine. That raises the need for safer operation, clearer procedures, and better containment. A small unit in a quiet room is very different from a busy shop with staff, visitors, and firm delivery dates.
Key safety features include lid interlocks, enclosed beam paths, emergency stops, dependable ventilation, and proper filtration. Good lighting and viewing windows also help operators watch the job without unsafe habits. If current safety controls feel improvised, the business has likely moved past the basic stage.
7. Order Growth Is Limited by One Machine
The clearest sign is a missed opportunity. Staff may turn down orders, stretch lead times, or avoid new product ideas because the cutter cannot keep up. That creates a ceiling, even when demand remains strong.
Capacity planning should account for average job time, setup, maintenance windows, reject rates, and peak demand. A stronger CO₂ laser cutter may reduce bottlenecks, but the right choice depends on workload. Bed size, wattage, cooling, software, and support all affect daily value.
Conclusion
Outgrowing a basic CO₂ laser cutter is less about status and more about control. Slower batches, limited materials, uneven quality, heavy setup, frequent maintenance, safety gaps, and capped order volume all point to the same issue. The machine may still run, but it may no longer match the workload. By tracking these signs early, a business can plan its next upgrade with clearer costs, fewer delays, and steadier production.


Losing a job can put more than your paycheck under pressure. It can quickly affect household budgets, emergency savings, benefits, and retirement plans that may have been sitting quietly in the background for years. According to the Federal Reserve, only 55% of U.S. adults in 2025 said they had enough emergency savings to cover three months of expenses, which shows how quickly a sudden income loss can become a broader financial challenge. If you’re suddenly looking at an old 401(k), pension paperwork, or a benefits portal you never expected to study this closely, the important thing is not to rush. A few careful decisions now can help protect both your immediate financial stability and your long-term retirement goals.
Start With a Clear Snapshot of What You Have
Right after a layoff, retirement accounts often get pushed behind more urgent concerns like bills, health coverage, and job hunting. Fair enough. Still, your first move should be simple: figure out exactly what accounts you have and where they sit.
Check whether you have a 401(k), pension benefits, company stock, or both. Review the account balance, vesting schedule, plan fees, and any deadlines tied to distributions or rollovers. If your former employer used multiple providers over the years, you may need to track down more than one account.
Keep a short list with:
– Account types and balances
– Login details and statements
– Beneficiary information
– Vesting status
– Pension payout options
Think of it as financial triage, minus the dramatic hospital soundtrack.
Know Your Main Options for a 401(k)
Once you understand the account, you can decide what to do with it. In most cases, you’ll have a few standard choices: leave the money in the old employer plan, roll it into an IRA, move it into a new employer’s plan, or withdraw it.
Rolling funds into an IRA gives you more control over investment choices and often better visibility into fees. Moving money into a new employer’s 401(k) can simplify your accounts if the new plan is strong, while leaving the money where it is may make sense if the existing plan offers low fees and solid investment options.
For workers coming out of the oil and energy sector, the decision can feel more complicated because layoffs may follow sudden changes in commodity prices, drilling activity, or company spending. When you’re managing your 401(k) after an oil industry layoff, the key is matching the option to your timeline, tax situation, and future job plans. Convenience matters, but so do fees, flexibility, and how soon you expect to move into another employer-sponsored plan.
Avoid Cashing Out Unless You’ve Exhausted Other Options
A lump-sum withdrawal can look tempting when income suddenly disappears. The problem is that early withdrawals usually come with taxes, possible penalties, and a major hit to your future retirement balance. Money that took years to build can shrink fast.
If you’re under age 59½, cashing out a 401(k) often triggers a 10% penalty along with ordinary income taxes. Depending on your state, the tax bite can get even uglier. A $50,000 balance may deliver much less than expected after the dust settles.
Before taking money out, look at alternatives such as:
– Emergency savings
– Severance pay
– Unemployment benefits
– Spousal income
– Temporary contract work
– Budget cuts and debt restructuring
Retirement savings should usually be your backup plan, not your first escape hatch.
Don’t Overlook Pension Decisions
Some workers may also have pension benefits, and those decisions can carry even more weight than a 401(k) rollover. A pension may offer a lump sum, a monthly annuity, or survivor options for a spouse. Each choice can affect long-term income, taxes, and financial security in retirement.
A monthly payment can provide steady income, which feels reassuring during uncertain periods. A lump sum gives you more control, though it also shifts investment responsibility onto you. That’s not automatically bad, but it does mean you need a plan.
Pay attention to:
– Whether you’re fully vested
– Single-life versus joint-and-survivor options
– Cost-of-living adjustments
– Pension start dates
– Tax treatment of lump sums
One rushed signature can lock in a choice for decades. Slow down and read every line, especially the fine print doing its usual tiny-font mischief.
Watch Out for Taxes, Fees, and Timing Mistakes
A lot of expensive retirement errors happen because people move too fast or assume the paperwork is routine. It isn’t. Direct rollovers and indirect rollovers are not the same thing, and mixing them up can create tax headaches you didn’t ask for.
With a direct rollover, the money moves straight from one retirement account to another. That usually avoids withholding taxes and keeps things cleaner. With an indirect rollover, the money comes to you first, and you generally have 60 days to redeposit it. Miss that deadline and the IRS may treat it as a taxable distribution.
Also check for:
– Administrative fees in the old plan
– Investment expense ratios
– Required withholding rules
– Company stock tax implications
– Deadlines for pension elections
The forms may look boring, but boring paperwork can do real damage if you sign on autopilot.
Rebuild Your Retirement Strategy Around Your New Reality
A layoff changes more than your monthly income. It can alter your risk tolerance, retirement timeline, savings rate, and even where you plan to live. That means your old investment setup may no longer fit.
If you expect to return to a similar role soon, your strategy may stay close to the original path. If you’re switching careers, starting a business, or taking a lower-paying position, you may need to adjust contributions and retirement age expectations. The goal isn’t perfection. It’s realism.
Ask yourself:
– Will you need income from savings soon?
– Can you keep contributing through a new job or IRA?
– Has your emergency fund become too thin?
– Are your investments too aggressive for your current stress level?
Financial planning after a layoff is less about chasing market returns and more about building stability when the ground feels uneven.
Get Help When the Choices Start Affecting Long-Term Outcomes
You don’t need to become a retirement expert overnight, and you definitely don’t need to decode pension language like it’s a spy novel. Some choices are straightforward. Others carry tax consequences or income tradeoffs that deserve a second set of eyes.
If your package includes a pension, company stock, deferred compensation, or multiple retirement accounts, professional advice can be worth it. A qualified financial advisor or tax professional can help you compare payout options, evaluate rollover strategies, and avoid preventable mistakes.
Look for support that helps you:
– Understand the tax impact of each option
– Coordinate retirement assets with short-term cash needs
– Review survivor and beneficiary decisions
– Align investments with your next career move
A layoff can feel like everything is on pause. Your retirement planning doesn’t have to be. Smart decisions now can give you more control, fewer regrets, and a much steadier path into whatever comes next.
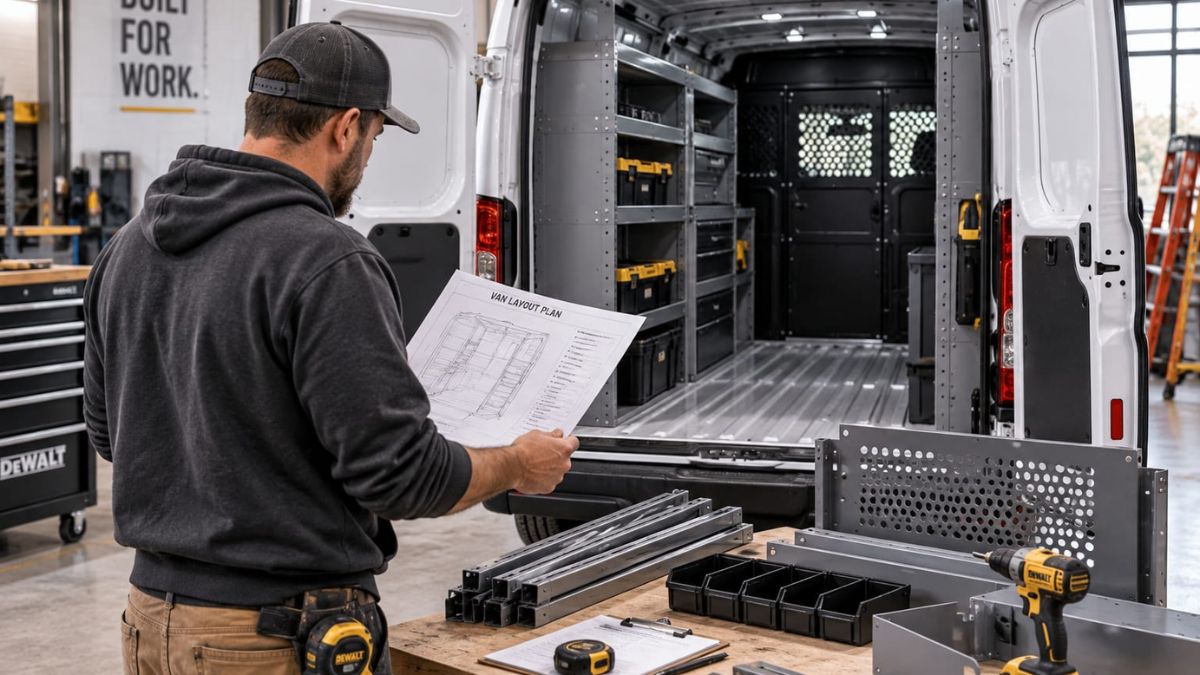
A new cargo van gives contractors an opportunity to build a workspace around the way they actually operate. The challenge is deciding what that workspace needs before shelving, partitions, racks, drawers, and other equipment are installed.
Effective van upfitting starts with planning rather than choosing components. A plumber carrying fittings and power tools has different requirements from an electrician managing small parts, ladders, cable, and testing equipment. Even two businesses in the same trade may organize their vehicles differently based on crew size and the type of work they perform.
Before installation begins, contractors should understand what the van needs to carry, how workers will access it, and how those requirements may change over time.
Start With the Vehicle and Its Working Limits
Upfit planning should begin with the specific van rather than a generic storage system. Cargo length, roof height, door openings, payload capacity, wheel wells, factory mounting points, and other vehicle features can influence what can reasonably be installed.
Payload deserves particular attention. Shelving, partitions, ladder racks, drawers, tools, parts, and materials all contribute to the weight carried by the vehicle. A layout that provides extensive storage is not necessarily practical if it leaves insufficient capacity for everyday cargo.
Contractors should also consider how workers enter and use the cargo area. A high-roof van may allow someone to work comfortably inside, while a smaller model may need to prioritize access from the rear and side doors.
Taking measurements is important, but measurements alone do not create an effective work van setup. The vehicle’s physical limits need to be considered alongside its daily tasks.
Inventory What the Van Actually Carries
Before selecting van storage solutions, create an inventory based on real working conditions. This should include more than major tools.
Consider hand tools, power tools, batteries, chargers, fasteners, fittings, replacement parts, safety equipment, cleaning supplies, paperwork, and trade-specific materials. Include ladders and oversized equipment that may need dedicated mounting or rack systems.
It can help to separate the inventory into categories based on frequency of use. Equipment needed at almost every service call should generally be easier to reach than tools used once a month.
The same principle applies to quantities. A shelving configuration designed around one small organizer may quickly become inadequate if technicians routinely carry several cases of parts.
Planning around an actual inventory also reveals equipment that requires special treatment. Fragile instruments may need protected storage, while long items may require dedicated space that cannot be interrupted by standard shelving.
Design Around Access, Not Just Storage Capacity
It is tempting to evaluate a van interior by how much equipment can fit inside. For working contractor vans, accessibility can be equally important.
Frequently used items should be positioned where workers can retrieve and return them without unloading unrelated equipment. If a technician needs to move several cases every time a common fitting is required, the layout may create unnecessary work throughout the day.
Think about where tasks happen. Equipment used immediately after opening the side door may belong near that entrance. Larger tools loaded from the rear need a clear path. Small parts may benefit from drawers or bins that allow workers to identify contents quickly.
This is also the stage to consider shelving configuration, drawer heights, open floor space, and ladder storage. The goal is not to fill every available surface. Some open capacity can make the vehicle more adaptable when an unusual job requires additional materials or equipment.
Account for Safety and Cargo Separation
Storage decisions can also affect how equipment behaves while the vehicle is moving. Tools and materials should have appropriate locations rather than being left loose in the cargo area.
A cargo partition is one component that deserves consideration early in the planning process. Separating the cab from the cargo area can help create a defined barrier between occupants and equipment stored behind them. The appropriate partition and configuration will depend on the vehicle and its intended use.
Heavy items should also be considered carefully when determining storage locations. Placing substantial equipment high on shelving simply because space is available may not be the best approach. Weight distribution, secure mounting, and practical lifting heights should be considered together.
Exterior equipment matters as well. If ladders or long materials are part of daily operations, ladder racks and related systems should be incorporated into the original plan rather than treated as an afterthought.
Plan the Upfit for Tomorrow’s Work Too
A commercial van may remain in service while a business changes substantially. A solo contractor might add technicians. A service company may expand into new types of work. Equipment inventories can grow as tools and technology change.
Planning some flexibility into the layout can reduce the likelihood that the entire configuration needs to be reconsidered later.
This does not mean installing storage for equipment the business may never own. Instead, contractors can identify areas where growth is reasonably likely. Additional parts bins, changing tool cases, new battery systems, or expanded material inventories are common examples.
Professional commercial van upfitting becomes particularly useful when these requirements need to be translated into a layout that fits a specific vehicle. Contractors looking for professional van upfitting in Waterloo can work with Tri-City Custom Upfitters when planning storage, partitions, racks, and other vehicle-specific equipment.
The important step is arriving at that stage with a clear understanding of what the van needs to accomplish. An installer can then work from practical requirements rather than trying to build a configuration around a collection of components selected in isolation.
A well-planned work van begins long before the first shelf is installed. By reviewing the vehicle, documenting equipment, considering accessibility and safety, and allowing for realistic future needs, contractors can create a configuration suited to how the van will actually be used.
-

 NEWS1 year ago
Historical Churches in Manila
-

 TOPIC2 months ago
Unveiling AvTub: Your Ultimate Guide to the Best AV Content
-

 TOPIC1 year ago
Symbols of Hope: The 15th Belenismo sa Tarlac
-

 TOPIC1 year ago
RIZAL at 160: a Filipino Feat in Britain
-

 TOPIC1 year ago
“The Journey Beyond Fashion” – Ditta Sandico
-

 TOPIC3 weeks ago
Understanding Fascisterne: Origins and Ideological Roots
-

 TOPIC1 year ago
Simbang Gabi and Kakanin
-

 TOPIC1 year ago
5 Must-Have Products From Adarna House to Nurture Your Roots