
TOPIC
How to Prepare an Electric Bike for Off-Road Riding and Weekend Adventures


Heading out on an electric bike for a weekend trail ride sounds simple enough, but a little preparation can save you from a lot of trouble later. A quick check of the bike, battery, route, and riding gear is worth doing before you leave, especially when you’ll be riding somewhere without easy access to help.
Off-road riding is harder on both the bike and the rider than a normal trip on paved roads. Tires can pick up sharp debris, brakes get more use, and rough ground can put extra strain on the bike. Whether you’re taking an electric dirt bike for adults into the hills or heading out for a short gravel ride, preparing properly before you leave can make the whole trip easier and more enjoyable.
Start With a Real Inspection, Not a Glance
Before any serious off-road trip, actually look the bike over — do not just eyeball it from across the garage. Check the tires for cuts, odd wear patterns, anything embedded in the rubber, general damage. Don’t forget to check your tire pressure either since it impacts many things that go into riding experience, including traction, comfort, stability and rolling resistance. How much it needs to be inflated depends on your tires, your weight, riding surface and manufacturer’s recommendations – so no guesses here.
Press both brake levers, make sure there is enough pressure and then inspect pads and rotors for signs of wear. Since off-road riding involves a lot of descending on unstable surfaces, reliable brakes are essential here.
Gears and pedals doing what they are supposed to? Then finish up by checking the frame, handlebars, and fasteners — nothing should be loose, nothing should rattle when you shake the bars.
Get the Battery Ready for the Trail
Once you’re away from a wall outlet, battery management starts mattering a lot more than it does on your daily commute. Start every trip fully charged with a secure connection, and if your bike runs a removable battery, double-check it’s actually seated properly before you roll out.
Plan Around Real-World Range, Not the Marketing Number
Don’t build a ride around the maximum range printed on the box. Off-road conditions — more rolling resistance, constant acceleration, hill climbs, heavier motor use throughout — chew through a battery faster than flat pavement ever will.
If your bike normally gets you 60 kilometers on mixed city roads, don’t assume that number holds up on a demanding mountain trail, because it probably won’t. Build in a safety margin and plan to turn back before your charge gets uncomfortably low, rather than gambling on the way out and hoping it works out. On longer trips, it’s worth knowing ahead of time whether there’s anywhere to charge along your route. If there isn’t, just plan the entire ride around what the bike can realistically deliver.
Match Your Tires to the Terrain
Tires probably matter more off-road than any other single component on the bike. A tire built for pavement does fine on pavement and struggles the moment it hits loose dirt, mud, gravel, or rocky ground. Off-road tires use tread patterns built specifically to hold traction where conditions are less predictable.
Different trails want different tread. Firm, rocky ground tends to favor tires with efficient rolling and solid grip. Muddy or loose surfaces want deeper, more aggressive tread instead. Pressure changes the feel too — go lower and you generally get better traction and cushioning, go too high and rough ground starts feeling harsh with less grip to show for it. Just don’t push past what your tire manufacturer recommends. The goal is control, not a blown tire or a bent rim halfway through the ride.
Check the Suspension Before You Head Out
Suspension does a lot of the heavy lifting for off-road comfort and control. Got full suspension? Check the front fork and the rear shock both, before you’re deep into rough trail — look for oil leaks, movement that seems off, damage, anything loose that shouldn’t be.
Well-tuned suspension keeps your tires planted on the ground and absorbs impacts instead of passing them straight up into your hands and spine. What counts as “well-tuned” depends on your weight, your riding style, and the terrain — so don’t assume a setting that feels perfect on soft dirt will hold up just as well on something harder and rockier.
Pack Like Something Might Go Wrong
Put together supplies for the stuff you hope won’t happen but sometimes does. A basic repair kit can turn a puncture or a loose part into a five-minute fix instead of the end of your ride. Depending on how long and how remote the trip is, bring water, food, some way to navigate, a way to communicate if things go sideways, and gear that actually suits the weather you’re heading into.
Planning matters even more once you’re off-road. Tell someone where you’re going and roughly when you expect to be back — that’s not optional caution, that’s just smart. Download maps for offline use anywhere cell signals might drop out. And check the weather before you leave, because dirt trails turn slick fast in the rain, and getting back out can suddenly get a lot harder than getting in was.
Dress for What You’re Actually Riding Into
Your gear needs to match the riding you’re planning to do, not just whatever’s comfortable to throw on. A helmet isn’t up for debate. Gloves help with grip and protect your hands. Real riding shoes give you far more control than whatever sneakers you happened to be wearing that morning.
On tougher trails, knee and elbow protection is worth the extra step. Clothing should hold up against changing weather, mud, dust, branches — all of it — while still letting you actually move. None of this gear is about encouraging riskier riding, by the way. It’s there for the day something goes wrong that you didn’t plan for.
Ride Differently Once the Pavement Ends
An electric bike behaves differently the second the pavement disappears. Loose surfaces punish an aggressive hand on the throttle — snap it too hard and the rear wheel can lose traction fast — so smoother, more deliberate throttle input matters a lot more off-road than it ever did on the street. Slow down for corners you don’t know, descents that look steep, obstacles you haven’t seen coming before.
Body position matters here too. A relaxed stance lets the bike move underneath you while you stay in control through the bars and your own weight shifting side to side. Keep your eyes up, looking ahead instead of locked on the front wheel — that extra half-second of warning is often exactly what lets you spot a rock or a root or a rut in time to actually react to it.
Good preparation turns a rough trail into a manageable adventure instead of a stressful one, and that’s especially true if you’re still new to riding off-road. Building confidence gradually beats testing your limits on the hardest trail you can find in your first week.
Clean and Recheck the Bike When You Get Home
Preparation doesn’t stop the moment you’re back. Mud, dust, sand, water — all of it ends up in the drivetrain, the wheels, the suspension, the frame, after pretty much any off-road ride worth taking. Clean the bike the way the manufacturer recommends, and never aim high-pressure water at anything electrical.
Once it’s clean, look it over again for damage. Tires, brakes, chain, wheels, frame — check all of it, then recharge the battery with the charger made for your bike. A quick inspection after every ride catches the small stuff while it’s still small, before it turns into the kind of repair that keeps you off the trail for a while.
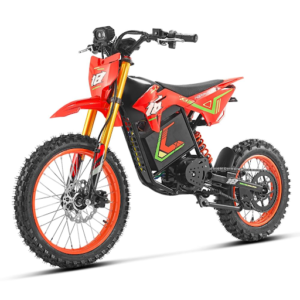
Recommended HappyRun Electric Dirt Bikes for Off-Road Riding
If you’re preparing for weekend trail rides, HappyRun offers several electric dirt bikes worth considering. The G18 Pro delivers 4,500W peak power, speeds up to 38 mph, and up to 75 miles of range, making it a balanced option for riders who want strong performance with plenty of range. The G300 Pro increases output to 6,500W peak power and reaches up to 50 mph off-road, with 70+ miles of range for longer adventures. The F18 2.0 combines a 6,000W peak mid-drive motor with 245 N·m of torque and speeds up to 46 mph, making it well suited to riders who want strong acceleration and responsive off-road performance.
Final Thoughts
Getting an electric bike ready for off-road riding is about more than charging the battery and picking a trail. Solid tires, reliable brakes, tuned suspension, a realistic sense of your battery’s range, drivetrain maintenance, the right protective gear, route planning, and adjusted riding technique all play a part in a ride that actually goes well. Knowing what to check before you leave, planning around your bike’s real-world range, packing the right gear, and adapting your riding style to the terrain all add up to more confidence once you’re out there — and that’s what lets the focus stay where it belongs: on riding and enjoying the trail. If your current bike isn’t built for the terrain you’re chasing, exploring an electric motorcycle can help you find a model with the suspension, power, and durability serious weekend trails demand.
Frequently Asked Questions
How long should I spend inspecting my electric bike before an off-road ride?
Usually 10 to 15 minutes covers it — tires, brakes, drivetrain, suspension, fasteners. That’s a small price to pay compared to dealing with a problem miles into a trail with no help around.
How much should I trust the advertised range for off-road riding?
Treat it as a best-case number, nothing more. Off-road conditions eat through battery faster than flat, paved routes do, so plan around something more conservative and give yourself a safety margin.
What tire pressure works best off-road?
Depends on your tire type, your weight, and the terrain — but generally, lower pressure helps traction and cushioning on loose or rocky ground. Just stay inside whatever range your tire manufacturer recommends.
Do I need special gear to ride an electric bike off-road?
At the very least, a helmet and gloves. On rockier or more technical trails, knee and elbow protection plus proper riding shoes add real, meaningful safety.
How often should I clean my electric bike after riding off-road?
After every single ride that involves mud, dust, or water. A quick clean-and-check catches small problems — a loose bolt, worn brake pads, tire damage — before they turn into something bigger.

Streaming boxes, compact disc transports, televisions, converters, and network players still need clean signal paths between components. While wireless playback is convenient, many serious listening rooms depend on wired links for stable timing and lower noise exposure.
A coaxial connection can be simple, affordable, and precise when the source and converter both support it. That makes it worth another look for anyone refining a two-channel system or home theater rack this year.
The Case for Coaxial Audio
A proper 75-ohm connection helps move encoded sound from one device to another with controlled impedance. That matters because timing errors can affect how a converter rebuilds the analog signal. For systems using a disc transport, streamer, or television output, an audio coaxial cable can provide a direct electrical path that avoids some limits of optical links.
Coaxial audio uses voltage rather than light. That gives it different strengths than fiber optical formats. It can support strong bandwidth, firm connector contact, and reliable transfer across typical room distances. The result is not magic; it is basic signal management, where geometry, shielding, plugs, and impedance all shape performance.
Why Timing Still Matters
Digital sound is built from samples. Each sample must reach the converter in a steady sequence. If clock recovery becomes less stable, the converter may produce subtle distortion, softer edges, or flatter imaging. This issue is often called jitter, and it remains relevant in modern playback chains.
A better cable cannot repair a weak source or poor converter design. Still, it can reduce one source of stress in the link. Lower noise pickup and consistent impedance help the receiving device interpret the stream with less correction. In revealing systems, those small gains can accumulate.
Coaxial Versus Optical
Optical cables have real advantages. They provide electrical isolation, which can help break ground loops. They also work well for televisions, soundbars, and simple media setups. For many casual rooms, optical audio is practical and clean.
Coaxial links are different. They often use stronger connectors, and their electrical format can be friendlier to some converters. Many listeners prefer coaxial between a transport and a separate converter because it can sound firmer and more open. The better choice depends on the equipment, cable length, and noise conditions near the rack.
Build Quality Counts
The term “coaxial” describes a structure, not a quality level. A basic cable and a carefully built one can both carry the same signal format. Their behavior may still differ under real use.
Shielding is a key factor. It helps block interference from power cords, wireless routers, amplifiers, and nearby screens. Conductor material, insulation, plug fit, and internal geometry also matter. A loose connector or poorly controlled impedance can weaken an otherwise capable link.
Length deserves attention as well. Very long runs can add loss. Very short runs may create reflection issues in some systems. For most home setups, a sensible length that reaches without strain is the right choice.
Where Coaxial Fits Best
Coaxial audio is useful between a compact disc transport and a converter. It also suits streamers, media players, televisions, and some professional-style interfaces. Many integrated amplifiers and receivers include a coaxial input because the format remains dependable.
It is also helpful during upgrades. A listener can keep a familiar source, then add a better converter later. The cable becomes the bridge between old and new gear. That keeps the system flexible without forcing a full replacement.
Practical Buying Tips
Check the connectors first. Most consumer gear uses RCA-style coaxial sockets. Some equipment may use BNC, which offers a tighter impedance match when both components support it.
Next, look for a true 75-ohm rating. Ordinary analog interconnects may fit the jacks, but they are not always built for this signal type. Cable routing also matters. Keep the line away from power strips, wall adapters, and bundled mains cords.
Finally, match the purchase to the system. Entry-level setups do not need exotic spending. More revealing systems can justify better shielding, tighter construction, and higher-grade connectors. The goal is balance, not excess.
Conclusion
Digital coaxial cables still matter because audio quality depends on more than file resolution or streaming service choice. The link between source and converter affects timing, noise exposure, and system flexibility.
Optical, USB, and network options all have a place, but coaxial remains a practical wired format for many rooms. With correct impedance, solid shielding, and sensible length, it can support cleaner playback without making the setup harder to use.

Metal fabrication shops rely on repeatable cuts, accurate holes, clean bends, and safe material handling. Throughput, finish quality, and operator fatigue are impacted by the right equipment on a shift-by-shift basis. A well-chosen setup also reduces rework because each station performs a clear task within its rated capacity.
Eight tools deserve special attention in a practical shop: an ironworker, a cold saw, a band saw, a press brake, a hydraulic press, a belt grinder, a pipe notcher, and a measuring system. Together, they cover most routine metalwork.
Material preparation sets the pace for downstream work. A shop benefits from equipment matched to its stock sizes, thickness ranges, and daily volume. For teams comparing professional tools for ironworkers, the key questions involve force, tooling access, alignment, and changeover time. Those factors determine whether an ironworker remains a useful production station or becomes a bottleneck during busy orders.
1. Ironworker
An ironworker combines punching, shearing, notching, and angle cutting in one machine. Its value comes from station versatility, but capacity must match the material schedule. Operators should check maximum punch diameter, stock thickness, throat depth, and available dies.
Separate work areas, proper guarding, and aligned tooling help maintain clean holes while limiting setup delays and unsafe adjustments. A labeled drawer keeps punches and dies organized, reducing selection errors between jobs.
2. Cold Saw
A cold saw produces square cuts with limited heat distortion, making it useful for tubing, bars, and structural sections. Blade selection should follow material type, tooth count, and section geometry. A solid vise and controlled feed improve cut consistency.
Shops should reserve coolant and chip management for applications that require them, then inspect burrs before welding or assembly. The operator should confirm blade condition before starting each production run.
3. Band Saw
Band saws handle long stock and larger profiles that may exceed a circular saw’s practical range. Variable speed, blade pitch, and guide adjustment affect both blade life and cut quality. A stop system supports repeat lengths, while roller support prevents stock from twisting.
Regular tracking checks also reduce wandering cuts and premature blade wear. Coolant, chip brushes, and scheduled blade changes protect finish quality during extended runs.
4. Press Brake
A press brake forms plates, channels, and brackets with controlled force and repeatable angles. Its useful range depends on tonnage, bed length, tooling, and material thickness. Operators should calculate bend allowance before cutting blanks, then verify the first piece with an angle gauge.
Backgauges and squaring arms help keep production parts consistent across batches. Tooling faces should remain clean, since debris can change the finished angle.
5. Hydraulic Press
Hydraulic presses apply concentrated force for straightening, forming, bearing removal, and fixture work. A pressure gauge helps operators stay within rated limits, while properly sized plates distribute force across the workpiece. The frame, ram, hoses, and pins need routine inspection.
Blocks must sit level and support the load fully, since unstable setups can shift suddenly under pressure. A return stop improves repeatability when several pieces require the same correction.
6. Belt Grinder
A belt grinder removes weld spatter, smooths edges, and prepares joints faster than hand filing. Coarse belts remove stock quickly, while finer grades refine the surface before coating. Contact wheels suit curved work, and platen surfaces support flat edges.
Dust collection, eye protection, and a maintained spark path are essential for controlled finishing. Belts should be changed before glazing causes excess pressure and heat.
7. Pipe Notcher
Pipe notchers create accurate saddle cuts for handrails, frames, and tubular assemblies. The correct die or abrasive setup should match outside diameter, wall thickness, and joint angle. A consistent clamping method prevents slipping and uneven gaps. After notching, a quick fit-up check reveals alignment issues before welding, saving filler material and correction time during final fit-up.
8. Measuring System
Measurement controls every preceding operation. A basic kit should include steel rules, squares, calipers, angle finders, and reliable marking tools. Higher-volume shops may add digital stops or positioning tables for repeat lengths.
Calibration checks should follow a simple schedule, with reference pieces used to confirm accuracy. Clear readings reduce scrap before expensive fabrication stages.
Conclusion
A productive fabrication shop does not need every available machine, but it does need complementary capabilities. Punching, cutting, forming, pressing, finishing, notching, and measurement cover a broad share of daily work. Selection should reflect stock, tolerances, production volume, and operator skill.
When each station has suitable capacity and maintained tooling, material moves with fewer delays, parts fit more predictably, and the shop gains dependable output without unnecessary equipment spending.
A fuel tank sticker’s purpose goes beyond just identifying the container. They help drivers, technicians, inspectors, and property owners make quick decisions around storage, filling, service, and emergency response.
The last thing you need is for a label to be unclear or missing at the worst possible time. Strong compliance starts with clear, durable information placed where people can see it. These seven details help keep tanks traceable, serviceable, and aligned with common safety expectations.
1. Fuel Type
Every tank label should state the fuel type in plain language. This detail helps prevent cross-filling, wrong deliveries, and unsafe handling. Diesel, gasoline, heating oil, kerosene, and propane each carry different storage and handling concerns. Clear wording matters more than clever design.
For tanks exposed to weather, fuel vapor, and frequent handling, durable fuel tank stickers should keep fuel type, warning text, and service details readable over time. A faded label can fail during inspection and can also slow field decisions during delivery, maintenance, or emergency response.
2. Hazard Warning
A tank sticker should show the main hazard in direct terms. Flammable contents, no smoking, restrictions on ignition sources, vapor danger, and pressurized contents are common cautions. The tank and fuel being stored should be reflected in the wording.
Warnings work best when they are short and visible from the normal approach point. Small text placed behind piping or under a lid may meet no practical need. Inspectors and crews should not have to search for basic risk information.
3. Tank Identification Number
Each tank should carry a unique identification number. This number links the physical tank to records, service history, delivery logs, inspection notes, and customer accounts. Without it, staff may rely on location alone, which can create errors on busy sites.
A good identification number should be easy to read and consistent with internal records. It should not change unless the tank is replaced or formally renumbered. Consistency helps teams compare field notes against office records without guesswork.
4. Capacity and Product Limits
Tank capacity should appear clearly on the sticker. This helps delivery staff avoid overfilling and supports accurate ordering. Emergency personnel who must estimate stored volume during an incident can also be guided by capacity.
Labels should also note any important limits. These may include maximum fill level, approved product type, or special handling restrictions. The goal is to make the tank’s safe use clear before anyone opens a valve or starts a transfer.
5. Owner and Emergency Contact
A compliant sticker should identify who owns, manages, or services the tank. It should also show a current phone number for service or emergency contact. This is especially useful for leased tanks, unattended locations, and multi-tank properties.
Contact details should be reviewed often. A phone number that no longer works gives a false sense of control. If ownership changes, stickers should be replaced quickly so field records and visible markings remain aligned.
6. Inspection and Service Dates
Inspection dates belong on or near the tank. A sticker can show the last inspection, next required check, requalification date, or service visit. This supports accountability and helps crews spot overdue work before it becomes a compliance issue.
Date fields should be simple and large enough for field writing. Smudged handwriting, tiny boxes, or weak ink can make the record useless. Labels used outdoors should support permanent markers or printed entries that resist moisture and sun.
7. Placement and Durability Details
Compliance is not only about printed words. The sticker must stay attached and readable in real conditions. Fuel tanks face rain, sun, dirt, abrasion, cold, heat, and chemical exposure. A weak label can peel before the next inspection.
Placement also matters. Labels should sit on clean, visible surfaces away from seams, heavy wear points, and areas likely to collect grime. The best location is usually near the fill point or normal service approach, where crews already look first.
Conclusion
A fuel tank sticker is a tiny item that plays a big part in compliance. It should identify the fuel, warn about hazards, connect the tank to records, show capacity, list contacts, track service dates, and remain readable outdoors. These details help reduce errors and support safer work.
Regulations can vary by fuel type and location, so every operation should review label content against current local requirements before ordering or replacing stickers.
-

 NEWS1 year ago
Historical Churches in Manila
-

 TOPIC2 months ago
Unveiling AvTub: Your Ultimate Guide to the Best AV Content
-

 TOPIC1 year ago
Symbols of Hope: The 15th Belenismo sa Tarlac
-

 TOPIC1 year ago
RIZAL at 160: a Filipino Feat in Britain
-

 TOPIC1 year ago
“The Journey Beyond Fashion” – Ditta Sandico
-

 TOPIC1 month ago
Understanding Fascisterne: Origins and Ideological Roots
-

 TOPIC1 year ago
Simbang Gabi and Kakanin
-

 TOPIC1 year ago
5 Must-Have Products From Adarna House to Nurture Your Roots