
TOPIC
What to Do If Your Tires Lose Pressure Overnight


You head outside on a chilly morning, ready to start your day—and notice that one (or more) of your tires looks a little low. Maybe your dashboard warning light is on, or maybe you just notice the sag visually. Either way, it’s a frustrating situation, and if it happens regularly, you may wonder: why do my tires keep losing pressure overnight?
Tire pressure loss is especially common in colder weather, but it can also point to underlying issues that require immediate attention. Whether it’s a temperature-related drop or a sign of a slow leak, knowing how to respond quickly can keep you safe, improve fuel economy, and extend the life of your tires.
In this guide, we’ll explain the most common reasons tires lose air overnight, how to safely refill them, and how to monitor pressure all winter long.
Why Tire Pressure Drops in Cold Temperatures
1. Cold Air Causes Natural Pressure Drop
For every 10°F drop in temperature, your tires can lose about 1–2 PSI (pounds per square inch). That means if your tires were properly inflated at 70°F, and overnight temperatures fall to 30°F, you could lose up to 8 PSI—enough to trigger a warning light or cause visible sag.
This pressure loss isn’t due to a leak—it’s simple physics. Colder air contracts, reducing the internal air volume inside your tires. While this type of drop is normal, it still needs to be addressed. Driving with underinflated tires puts extra stress on sidewalls, reduces fuel efficiency, and increases your risk of a blowout.
2. Tire Pressure Monitoring System (TPMS) Alerts
Modern vehicles are equipped with a tire pressure monitoring system that automatically notifies you when any tire drops below the manufacturer’s recommended pressure.
If your TPMS light turns on first thing in the morning and turns off after a few minutes of driving, it likely means your tires were slightly underinflated due to the cold. As the tires warm up, the air expands, raising the pressure and turning off the warning.
However, if the light stays on—or if your tires keep losing pressure overnight—it could indicate a deeper issue, such as:
- A slow puncture from a nail or debris
- A cracked valve stem
- Corrosion on the wheel bead
- Leaky valve core
If you’re refilling your tires frequently or the pressure loss affects only one tire, it’s time to inspect for damage or take it in for a pressure test.
3. Seasonal Tire Swaps and Improper Mounting
If you’ve recently switched to winter tires or installed tire chains for added traction, improper mounting can cause a slow leak.
When tires aren’t seated properly on the rim—or if dirt, rust, or ice is trapped between the bead and the wheel—it can create a slow air escape. Similarly, using chains without checking for clearance or tightness can put extra stress on sidewalls and pressure balance.
If you’re using tire chains or just had a tire change, double-check:
- That each tire is seated evenly on the rim
- Chains are installed correctly and not contacting tire sidewalls
- No visible punctures or damage
How to Safely Refill and Monitor Your Tires
1. Use a Quality Tire Gauge
Before you refill any tire, get an accurate pressure reading using a handheld tire gauge or a digital TPMS tool. Don’t rely solely on visual inspection—a tire can be 25% underinflated and still look “normal” to the eye.
Check pressure when tires are cold (ideally in the morning) for the most accurate reading.
2. Inflate to Manufacturer Specifications
Every vehicle has a recommended tire pressure—usually found on a sticker inside the driver’s door or in the owner’s manual. This number may vary depending on your tire size, load weight, and seasonal use.
Use an air compressor at home or at a gas station to bring each tire to the correct PSI. Be careful not to overinflate, as that can reduce traction and wear out the center tread prematurely.
If you need new valve stems or caps, or you notice air hissing around your valve, be sure to replace them or have them reseated professionally.
3. Don’t Forget the Lug Nuts
If you’re rotating tires or adjusting pressure on recently installed tires, make sure your lug nuts are properly torqued. Loose lug nuts can cause uneven wheel pressure, vibration, and even unsafe driving conditions—especially when tires lose pressure.
After any tire maintenance, double-check the tightness of your lug nuts using a torque wrench set to your vehicle’s specifications.
4. Monitor Tire Pressure Weekly in Winter
During cold months, checking your tire pressure once a week is a smart habit. Many vehicles now allow you to view real-time pressure data from your infotainment screen—but even without that, a $10 tire gauge can give you peace of mind.
If your TPMS light comes on regularly, or you lose pressure in the same tire more than once, schedule an inspection. A slow leak can be repaired before it becomes a blowout.
Final Thoughts: Stay Ahead of Tire Pressure Problems This Winter
Losing tire pressure overnight isn’t always a sign of serious trouble—but it is something you shouldn’t ignore. Cold temperatures naturally reduce air pressure, but repeated or uneven drops can point to a leak or mounting issue.
With a reliable tire pressure monitoring system, the right tools, and a regular check-in routine, you can avoid flats, maintain traction, and keep your fuel efficiency high even in freezing conditions.
Remember: tires are your only point of contact with the road. Whether you’re dealing with cold air contraction, a slow leak, or the effects of snow chains and winter driving, a proactive approach keeps you safer and helps your vehicle perform at its best.
Let me know when you’re ready for the next article—we can cover tire rotation, winter driving prep, or how to choose the right snow-rated tires for your area.

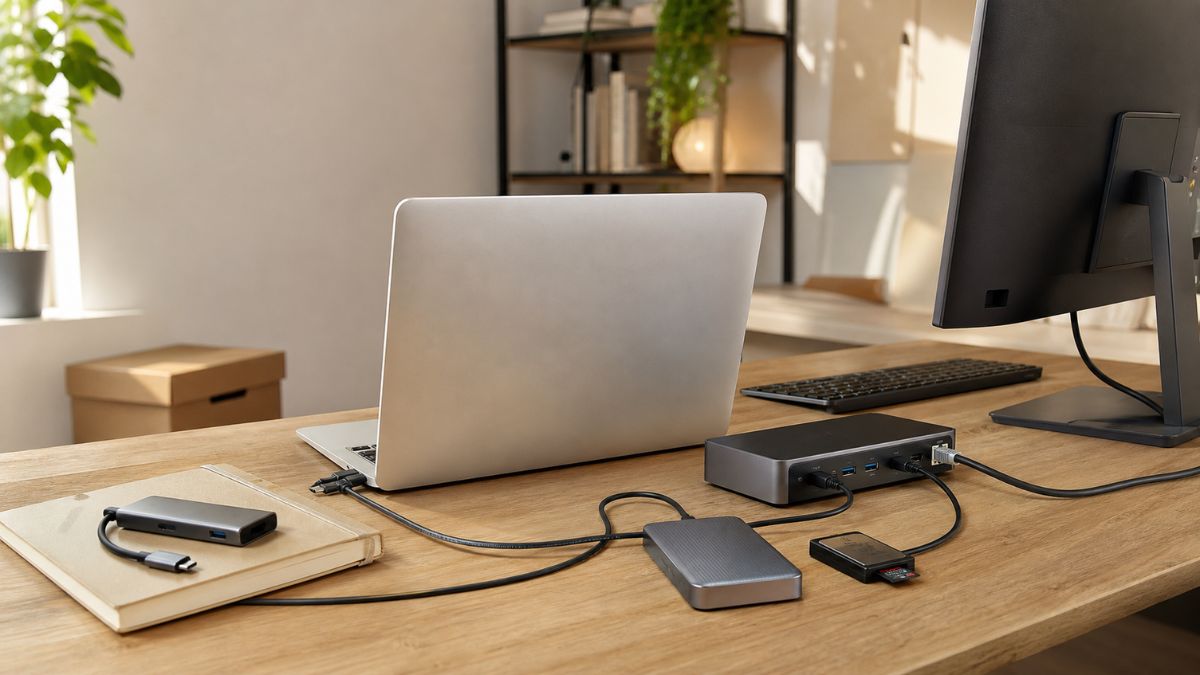
Laptop design has spent the past decade pursuing thinness. Every generation seems lighter, cleaner, and more portable than the one before it. The result is impressive engineering, but it has also created a strange consumer problem: a computer can remain fast enough for everyday work while feeling outdated because it no longer connects easily to the equipment around it.
A photographer may have a perfectly capable laptop with no memory card slot. A remote worker may need Ethernet for reliable video calls but have nowhere to connect the cable. A designer might want two external screens, while a student simply needs more ports for storage and classroom equipment.
None of these situations necessarily means the computer has reached the end of its useful life. They reveal a gap between computing performance and connectivity—a gap that modular accessories can often fill.
The Upgrade Cycle Is Not Always About Speed
People traditionally replaced computers because new software demanded faster processors or more memory. Today, many laptops remain responsive for years when used for documents, communication, research, media, and routine creative work.
Yet users can still feel pressure to upgrade. The battery may have aged, internal storage may be limited, or the available connections may not match newer equipment. Marketing encourages people to view these limitations as evidence that the entire machine is obsolete.
That conclusion is often too simple. A computer is a collection of systems, and those systems do not age at the same rate. The processor might remain adequate while the port selection becomes inconvenient. The display may still look excellent even though the laptop lacks a connection needed for a new monitor.
Modular computing treats these weaknesses as separate problems. Instead of replacing the complete machine, users can extend the particular capability that is missing.
A Permanent Desk Can Become an Expansion Layer
Thin laptops are designed to travel, but many spend much of their time on a desk. At that desk, extreme portability is less important than access to displays, storage, networking, power, and comfortable input devices.
A laptop docking station can act as an expansion layer for a compatible computer, consolidating several desktop connections around one central device. The laptop remains light when it leaves the desk, while the larger working environment stays assembled.
This separation is useful because portable and stationary computing have different requirements. A traveler values low weight and long battery life. A person editing video at home may prioritize screen space, wired storage, and dependable power. Expecting one thin enclosure to satisfy both situations without external support creates unnecessary compromises.
The dock allows the desk to hold the complexity. Monitors, drives, a keyboard, and networking equipment can remain connected even when the laptop is removed. Returning to the workspace becomes a matter of reconnecting the primary cable rather than rebuilding the setup from individual components.
Portability Requires a Different Kind of Expansion
A full desktop configuration is valuable at a regular workspace, but it is not always practical to carry. Mobile users usually need fewer connections for shorter periods.
A compact usb hub can provide additional ports for flash drives, keyboards, mice, card readers, and other peripherals without turning a travel bag into a second office. It offers temporary expansion rather than permanent infrastructure.
The difference between these two approaches is not simply size. A desktop solution may support charging, several displays, high-speed networking, and many peripherals at once. A portable hub is often selected for a narrower set of everyday connections.
Choosing between them starts with location. If an accessory will remain on a desk, stability, power, and comprehensive connectivity matter. If it will travel, weight, cable length, durability, and the most frequently needed ports become more important.
Some users benefit from both: a complete setup at home and a small adapter in the bag. This may seem like duplication, but the two devices solve different problems and can prevent constant disassembly of the main workspace.
The Connector Shape Does Not Tell the Whole Story
Modular computing works only when compatibility is understood. This is particularly important with USB-C, because identical-looking ports can support very different functions.
One port may carry basic data, while another also supports charging and video. Data speeds can vary significantly. A cable capable of charging a phone may not support an external display or high-speed storage. The laptop, accessory, cable, and connected device must all support the intended function.
This complexity can lead to disappointment when people buy based only on the number of ports shown in a product image. A more reliable approach begins with specific questions:
- How many external displays are required, and at what resolution and refresh rate?
- Does the laptop support video output through the selected port?
- How much power does the computer need during demanding work?
- Will external drives benefit from higher data speeds?
- Is wired Ethernet necessary?
- Which operating systems and laptop models are supported?
The answers may reveal that a modest accessory is sufficient. They may also show that a more capable desktop unit is justified. Compatibility research is less exciting than shopping by specifications, but it is far more likely to produce a setup that lasts.
External Storage Can Change the Replacement Decision
Limited storage is another common reason people consider replacing a laptop. Internal upgrades are difficult or impossible on many thin models, especially when components are soldered to the main board.
External drives offer an alternative for files that do not need to remain inside the computer. Photo archives, completed projects, media libraries, backups, and large reference collections can be stored outside the laptop while active documents remain on the internal drive.
This approach will not solve every storage problem. Applications and system files still require internal capacity, and carrying a drive may be inconvenient for highly mobile work. However, at a permanent desk, high-speed external storage can provide useful space without replacing an otherwise capable computer.
It also makes future transitions easier. When the laptop is eventually replaced, organized external files can move to the new setup without relying entirely on migration software.
Modular Accessories Can Outlive the Computer
A well-selected peripheral may remain useful across several laptop generations. Monitors, keyboards, storage devices, and connectivity accessories do not necessarily need to be replaced when the main computer changes.
This is one of the strongest arguments for treating the workspace as a system of separate components. When one part becomes inadequate, the others can remain in service.
Long-term value, however, depends on choosing equipment with realistic future needs in mind. Buying the cheapest possible solution for today’s minimum requirement can lead to another purchase as soon as a new display or faster drive arrives. At the same time, paying for capabilities that will never be used is wasteful.
The goal is reasonable headroom. A user who expects to add a second display should plan for it. Someone who works only with office documents may not need the highest available data bandwidth. Thoughtful modularity sits between underbuying and chasing every new standard.
There Is Still a Limit to Extension
Accessories cannot solve every form of aging. They cannot replace an unsupported processor, repair a failing battery, add missing security features, or make obsolete hardware compatible with demanding modern software.
Performance matters for video production, engineering, gaming, machine learning, and other intensive work. If the processor or graphics hardware cannot complete required tasks efficiently, external connectivity will not change that reality.
The purpose of modular expansion is not to keep every computer alive indefinitely. It is to prevent a minor limitation from being mistaken for total obsolescence.
A useful evaluation should separate problems into categories:
- Is the computer too slow for essential work?
- Is the battery unreliable?
- Is software support ending?
- Is storage insufficient?
- Or are the available ports simply inconvenient?
Only the first three may point strongly toward replacement. Storage and connectivity can often be addressed independently.
The Sustainability Benefit Depends on Quality
Extending a computer’s useful life can reduce demand for new manufacturing and delay electronic waste. Yet external accessories also require materials, packaging, and energy to produce.
The sustainability case therefore depends on durability. A poorly made adapter that fails after a few months adds waste rather than preventing it. Products should be selected for safe power delivery, effective thermal management, physical construction, and compatibility with the intended equipment.
Cables deserve particular attention because they experience frequent bending and pulling. Replaceable cables can help extend the life of a desktop setup, while strain relief and sensible cable routing reduce wear.
Consumers should also resist the urge to collect adapters without a plan. A drawer filled with rarely used accessories is not a modular system; it is simply another form of electronic clutter.
Repair the Capability, Not the Whole Computer
The most interesting idea behind modular computing is philosophical. It asks consumers to stop viewing a laptop as one indivisible product.
A computer can be fast enough but short on ports. It can have an excellent screen but insufficient storage. It can remain valuable even when one aspect of its design no longer matches the user’s routine.
External connectivity provides a way to repair capability without physically opening the machine. It allows a slim laptop to become expansive at a desk and adaptable on the road. More importantly, it gives users time to replace the computer when its central performance truly becomes inadequate—not simply when they need one more place to connect a cable.
The most sustainable laptop may not be the newest or the most upgradeable. It may be the one surrounded by a thoughtful collection of components that allows it to keep doing useful work.

Custom display boxes have one job no other packaging format shares: they need to sell the product before anyone picks it up.
This guide covers the core display box formats, the materials that support them, and how to think through choosing the right structure for a specific retail placement.
What Makes Custom Display Boxes Different From Standard Packaging
Standard retail packaging is designed to protect and present a single product on a shelf among many others. Display packaging is designed to hold and merchandise multiple units of a product as a self-contained retail unit, the box itself becomes the point-of-purchase fixture, not just the container for one item.
This distinction drives most of the structural and material decisions that go into a display box: it needs to hold weight across multiple units, stand independently (or hang, or sit on a counter) without additional store fixtures, and carry graphics designed to be read from a distance rather than examined up close.
Beyond the format decision, custom display boxes also need to account for how they’ll be restocked over the course of a promotional cycle, a display that looks strong on day one but is difficult for store staff to refill efficiently tends to sit half-empty for stretches of the promotion, undermining the visual impact the format was designed to create in the first place.
Core Display Box Formats
PDQ (Pretty Darn Quick) displays are pre-loaded shipper units that convert directly from shipping carton to retail display, minimizing in-store setup labor. Shipper displays are similar but typically larger, designed for floor placement rather than shelf or counter use. Open-front counter boxes sit on checkout counters or other high-traffic surfaces, holding smaller, often impulse-purchase items at eye level near the point of sale.
Freight and delivery logistics for custom display boxes deserve early planning attention, since larger floor-standing units and PDQ trays can require freight shipping arrangements different from standard parcel delivery used for smaller packaging orders. Confirming freight logistics and delivery windows with your supplier early avoids a display arriving after its intended in-store setup date.
- PDQ displays, shipper-to-shelf conversion, minimal setup labor
- Shipper display units, larger floor-standing format for high-volume merchandising
- Open-front counter boxes, compact, checkout-adjacent impulse merchandising
- 5-panel hanger boxes, pegboard-compatible format for wall or aisle display
Here’s what most buyers overlook: a display box design that looks strong on a screen or in a flat proof often reads very differently once assembled and viewed from a normal shopping distance under store lighting. Requesting a physical or 3D mockup and reviewing it from several feet away, not just up close on a desk, catches legibility and color-contrast problems before a full production run locks them in.
Material Choices: Corrugated vs. SBS Cardboard
Custom display boxes are manufactured from SFI-certified corrugated board or SBS (Solid Bleached Sulfate) cardboard, each suited to different display needs. Corrugated board provides the structural strength needed for floor-standing units carrying significant product weight, while SBS cardboard offers a smoother, higher-quality print surface better suited to counter displays where close-up print detail matters more than load-bearing capacity.
Retailer-specific requirements add another layer to sourcing custom display boxes. Beyond general format conventions, many chains maintain their own footprint, weight, and structural standards for anything placed on their floor or counters, meaning a display approved by one retail partner may need modification before it’s accepted by another.
Choosing the Right Format for Your Placement
The retail placement should drive the format decision, not the other way around. A product destined for checkout counter impulse placement needs a compact open-front box with strong close-range graphics. A product going to a floor-standing end cap display needs a larger shipper unit built to hold weight and stand independently for an extended promotional period.
Brands negotiating retail placement should confirm the specific display format the retailer expects before finalizing packaging specs, different retail chains often have different standard display footprints and weight tolerances.
Brand consistency across multiple display formats used simultaneously, a PDQ tray in one part of the store and a counter display at checkout, for example, requires coordinated design files and color standards shared across both formats, ensuring a cohesive brand impression regardless of which display a shopper encounters first.
Print and Finish for Maximum Shelf Impact
Display boxes support full CMYK or Pantone printing with matte and gloss finish options. Because display graphics need to communicate at a distance, design choices that work well on standard packaging, small text, subtle color contrast, often fail on a display box viewed from several feet away. Bold color blocking, large legible typography, and a clear single focal point tend to outperform more detailed designs in an actual retail environment.
Custom display boxes also benefit from a defined testing step before a full production commitment, building and reviewing a physical or 3D mockup under conditions similar to the actual retail environment (comparable lighting, viewing distance, surrounding product density) catches problems a flat digital proof can’t reveal.
Working With Retail Buyers on Display Box Approval
Getting a custom display box approved by a retail buyer typically requires more than submitting a design, most retailers want to see or review a physical sample or detailed 3D mockup that demonstrates the display holds its shape, meets their footprint and weight standards, and merchandises the product the way the brand intends before committing shelf or floor space to it.
Building buyer feedback into the design process early, rather than finalizing a display design and hoping it clears retailer review, generally shortens the overall path to launch. Some brands maintain a standing relationship with key retail buyers specifically to pre-validate display concepts before a full production commitment, reducing the risk of a rejected or reworked display late in the process.
Sustainability Considerations for Custom Display Boxes
Retailers increasingly evaluate vendor-supplied display packaging against their own sustainability commitments, making SFI-certified corrugated and cardboard sourcing a practical requirement rather than an optional upgrade for brands hoping to secure prominent retail placement with larger chains that have published sustainability standards for their supply chain.
Beyond material certification, display box design that minimizes unnecessary material use, right-sizing the structure to the actual product load rather than over-engineering for a larger safety margin than needed, supports both sustainability goals and cost efficiency simultaneously, a rare case where the two priorities align rather than trade off against each other.
Frequently Asked Questions
What materials are custom display boxes made from?
Custom display boxes are typically manufactured from SFI-certified corrugated board or SBS cardboard, chosen based on whether the display needs to bear significant weight or prioritize close-range print quality.
What is the minimum order for custom display boxes?
Custom display boxes are generally available from a minimum order quantity of 100 units, with a free 3D mockup often included to review the design before production.
How do I choose between display box formats?
The retail placement should drive the format decision, checkout counter placement calls for a compact open-front box, while a floor-standing end cap needs a larger, load-bearing shipper unit.
Do retailers have specific requirements for display boxes?
Yes. Many retail chains maintain their own footprint, weight, and structural standards for in-store displays, so confirming these requirements before finalizing a design is important.
How should display box graphics be designed?
Because display graphics need to communicate at a distance, bold color blocking, large legible typography, and a single clear focal point generally outperform detailed, close-up-oriented designs.
Do larger displays require different shipping than standard packaging?
Yes. Larger floor-standing units and PDQ trays can require freight shipping arrangements different from standard parcel delivery, worth confirming with your supplier early in the timeline.
Do retailers care about display packaging sustainability?
Increasingly, yes. Many larger retail chains have published sustainability standards for vendor-supplied packaging, making certified materials a practical requirement for prominent placement.
How do I keep branding consistent across multiple display formats?
Coordinated design files and shared color standards across all display formats used simultaneously ensure a cohesive brand impression regardless of which display a shopper encounters.
How do I know which display format my retailer expects?
Confirm directly with your retail buyer or category manager, since different chains often have their own standard display footprints and format preferences.
Can display boxes be customized for a specific retailer’s requirements?
Yes. Custom display boxes can be engineered to match a specific retailer’s footprint, weight, and structural standards once those requirements are confirmed.

Every August, parents build the same list. Backpack. Lunchbox. Shoes. Water bottle. Pencils. The back to school checklist hasn’t changed in twenty years, except for one item that keeps moving up: a kids smart watch, like the myFirst Fone S4.
A few years back, this item wouldn’t have made the top ten. Now it sits between the backpack and the lunchbox, because the stretch of the day where no adult has eyes on your kid hasn’t shrunk: the walk home, the bus ride, the twenty minutes between the school door and yours. A children’s smart watch covers that stretch without handing your kid a phone.
Think of this less as a pitch and more as a checklist: where the smartwatch actually fits, what to set up before day one, and which back to school tips matter once your kid is wearing one.
How to Prepare for Back to School with a Kids Smartwatch
Setup happens before the first day, not on it. Trying to configure contacts and geofencing on the morning-of is a recipe for a frustrated kid and a half-working watch. Spend an hour the week before.
Contacts first. Open the myFirst Circle app and add every adult your kid might need to reach: you, your co-parent, grandparents, the after-school program director. The myFirst Fone S4 only calls contacts you approve. Add them now so your kid never discovers a gap at the wrong moment.
Geofence second. Draw two zones: home and school. The best gps watch for kids lets you set a radius and get a notification the moment your kid enters or leaves it. You will know your kid arrived at school without a phone call. You will know your kid left school without a text.
Class Mode third. Align the watch’s silent hours with the school schedule. The myFirst Fone S4 has Class Mode, which mutes notifications during class and lifts them during lunch and dismissal. Set it up now so the watch doesn’t buzz during a math test in week one.
Back to School Tips for Parents: The First Week
The first week is when you find out what you forgot. Here’re the three things parents call for the most in week one.
The bus is late. Your kid is standing at the stop and the bus is twelve minutes behind schedule. A kids smart watch with calling means your kid calls you, you check the bus tracker, and your kid knows it is coming. No panic. No stranger’s phone was borrowed.
The pickup plan changes. Rain. A meeting ran long. Traffic. Your kid needs to know you are fifteen minutes late, not that you forgot. Voice call takes four seconds. Your kid waits inside the school door instead of on the sidewalk.
The kid forgets something. Lunchbox on the counter. Homework on the desk. A kids smart watch won’t fix forgetfulness on its own. A voice call from you at 11 AM means your kid knows to buy lunch instead of staring at an empty desk.
Back to School Safety Tips: What the Watch Does and Doesn’t Do
A smartwatch is a safety net. The back to school safety tipsthat work treat the watch as a tool your kid uses, not a tool you use on your kid.
New adults get added before they’re needed. A new teacher, a new carpool parent, a new after-school director, add them to approved contacts during setup week, not the week your kid actually needs to reach one of them.
Walk through what SOS means, out loud, before day one. Kids forget rules over the summer the same way they forget locker combinations. Don’t assume last year’s explanation stuck. Five minutes at the kitchen table beats finding out your kid didn’t remember what the button does.
Re-check the geofence against the new schedule. A new pickup spot, a new bus stop, an after-school program that didn’t exist in July, the zones you set last year may not match this year’s actual routine.
Back to School Prep: The Final 48 Hours
Two days before school starts, run through this list for your myFirst Fone S4:
- Charge the watch fully.
- Confirm the $12 monthly plan is active.
- Test a voice call from your kid to you and back.
- Verify the geofence covers the school entrance, not just the building center.
- Check that Class Mode is set for the right hours.
- Put the charger somewhere your kid can reach, because week one will drain the battery faster than any other week.
The back to school prep that matters is the prep you do before the chaos starts. Once school begins, you are reacting. The watch is the one thing you set up in calm so it works in a storm.
If you’re still building your list, start with the backpack and shoes. Then add the watch. The lunchbox can wait until you know the cafeteria schedule. The watch can’t wait, because the transit gap exists on day one.
-

 NEWS1 year ago
Historical Churches in Manila
-

 TOPIC1 year ago
Symbols of Hope: The 15th Belenismo sa Tarlac
-

 TOPIC1 year ago
RIZAL at 160: a Filipino Feat in Britain
-

 TOPIC1 year ago
“The Journey Beyond Fashion” – Ditta Sandico
-

 TOPIC4 weeks ago
Unveiling AvTub: Your Ultimate Guide to the Best AV Content
-

 TOPIC1 year ago
5 Must-Have Products From Adarna House to Nurture Your Roots
-

 TOPIC1 year ago
Filipino, alternative language course at Moscow State University
-

 TOPIC1 month ago
Understanding Fascisterne: Origins and Ideological Roots